
Advanced Query
Techniques
VICKY WALL
AND
LENNA WENKE

Welcome!
At the end of this course users will:
• Be able to add criteria to a left outer join.
• Utilize subqueries to effectively search for query data information.
• Efficiently find record and field information using the front end of
PeopleSoft in conjunction with other tools.
• Gain the knowledge and skills to check your query results to be
confident of query accuracy.
• Effectively apply aggregate functions to query results.
• Utilize the Having tab to add criteria to fields using aggregate functions.
• Be able to create expressions to allow complex refining of query results.
• Understand BIND records and how they affect query development.
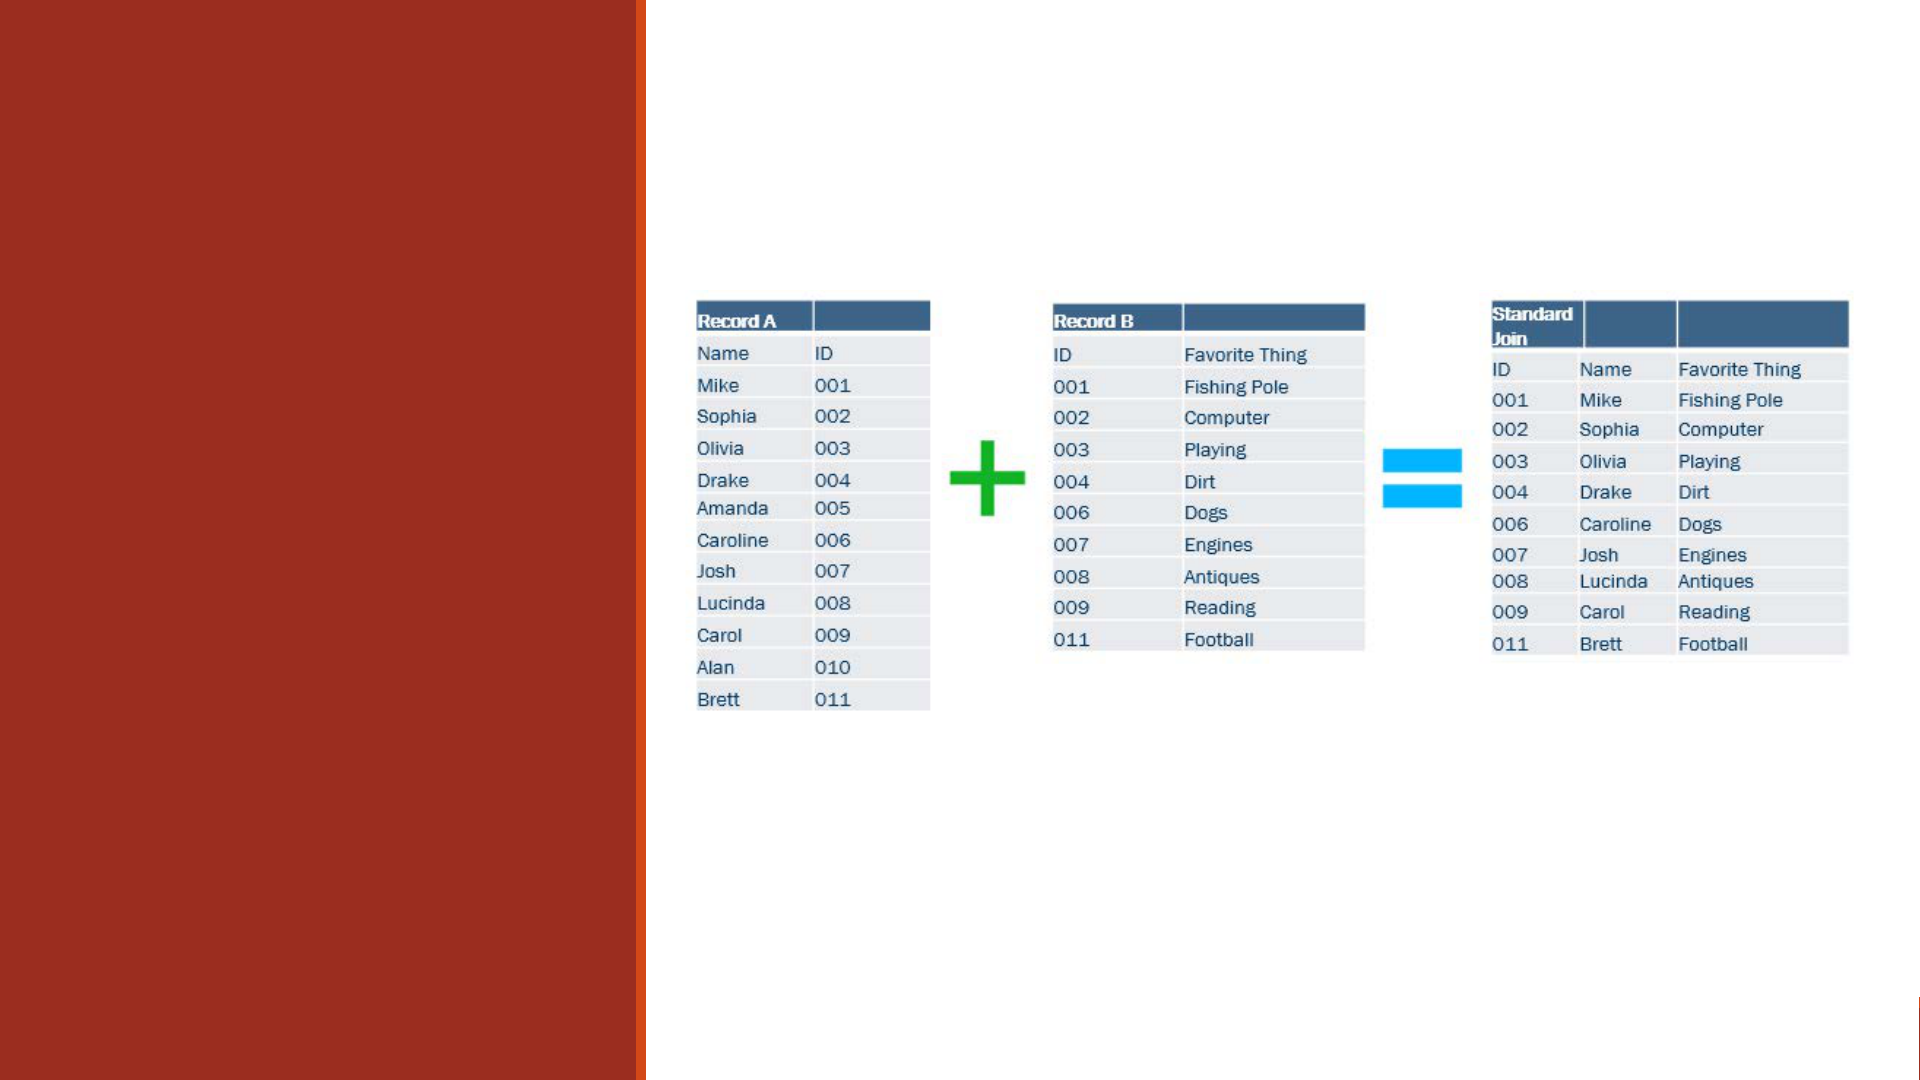
Standard Joins
Standard joins only display rows
where there is a match between BOTH
records, meaning it is possible not all
of the rows from Record A will be
displayed.
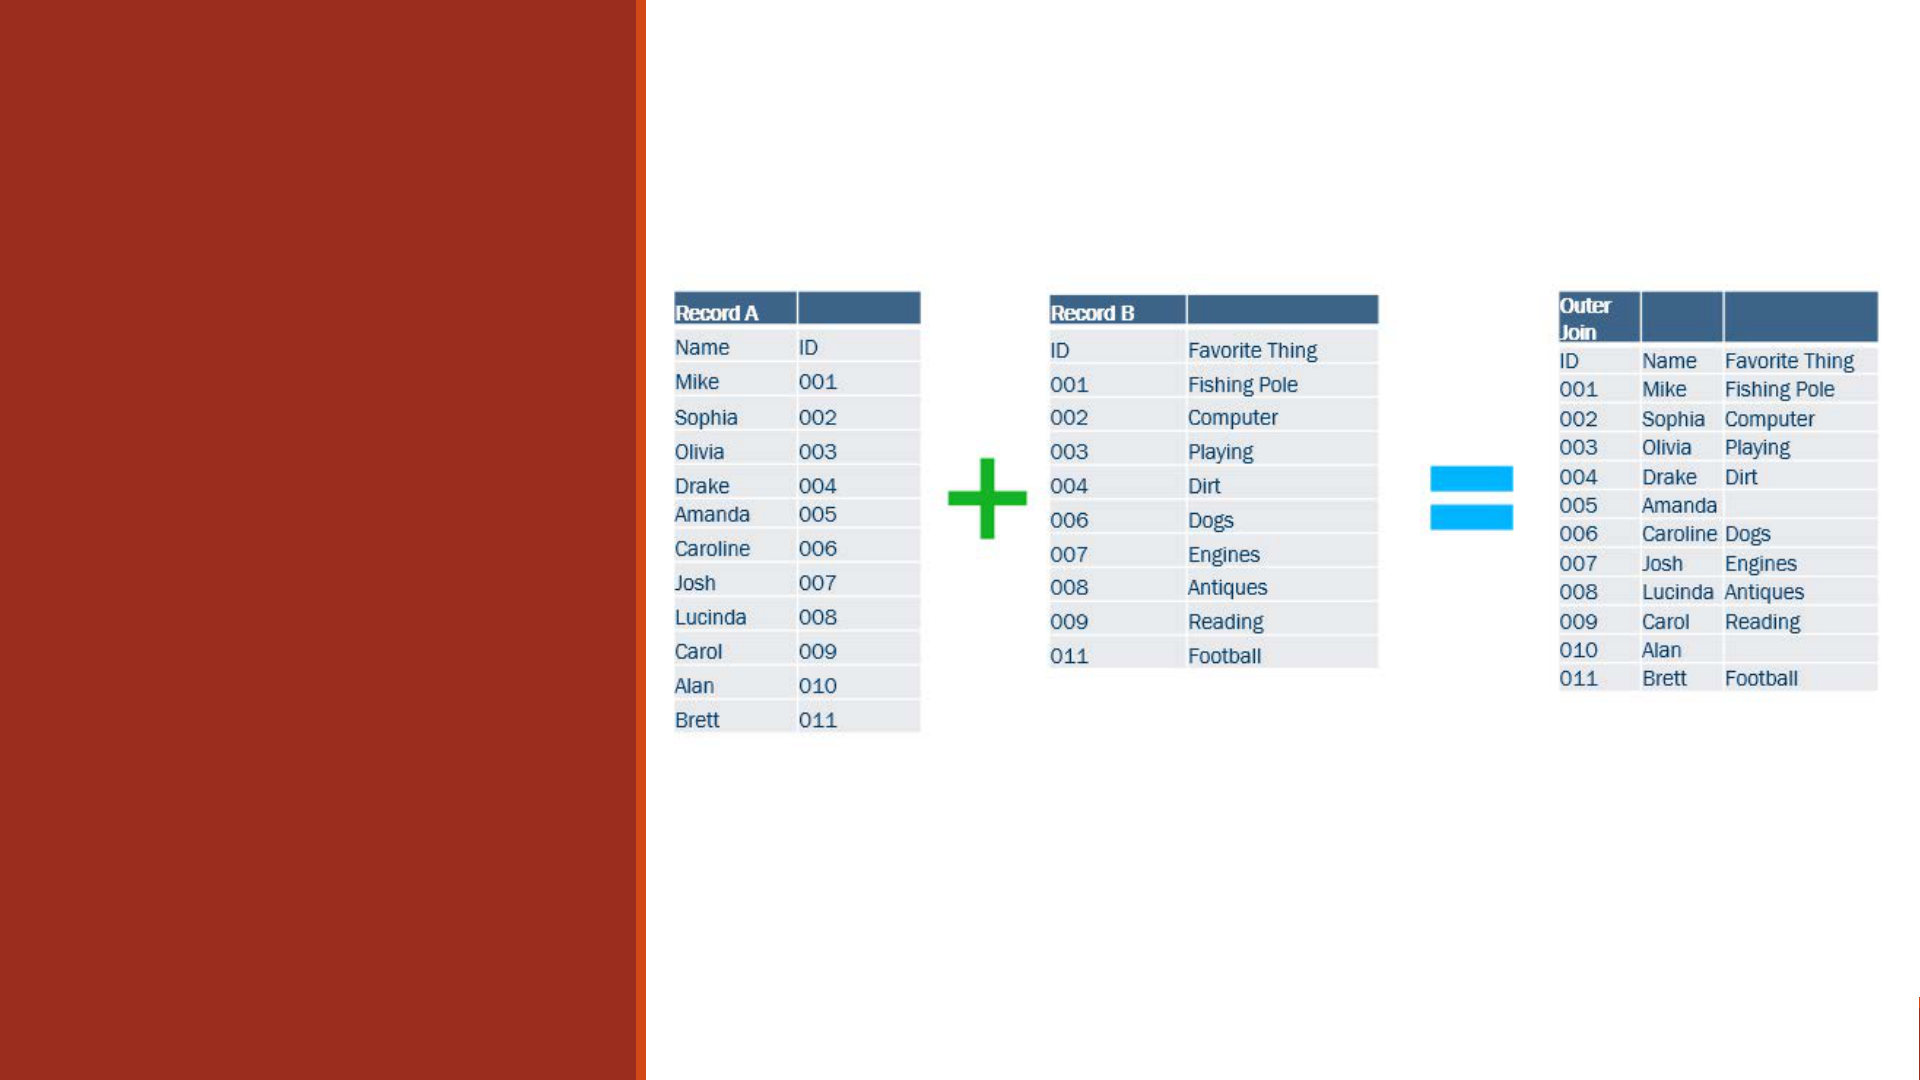
Outer Join
This join type will always display all of
the rows in Record A. It will simply
display BLANK where there is no
match.
Example: Normal Outer Join
Suppose we wanted to have a list of all our
enrolled GRAD students for Fall 2016 and we
want to know if they have a mobile phone
number stored in our system.
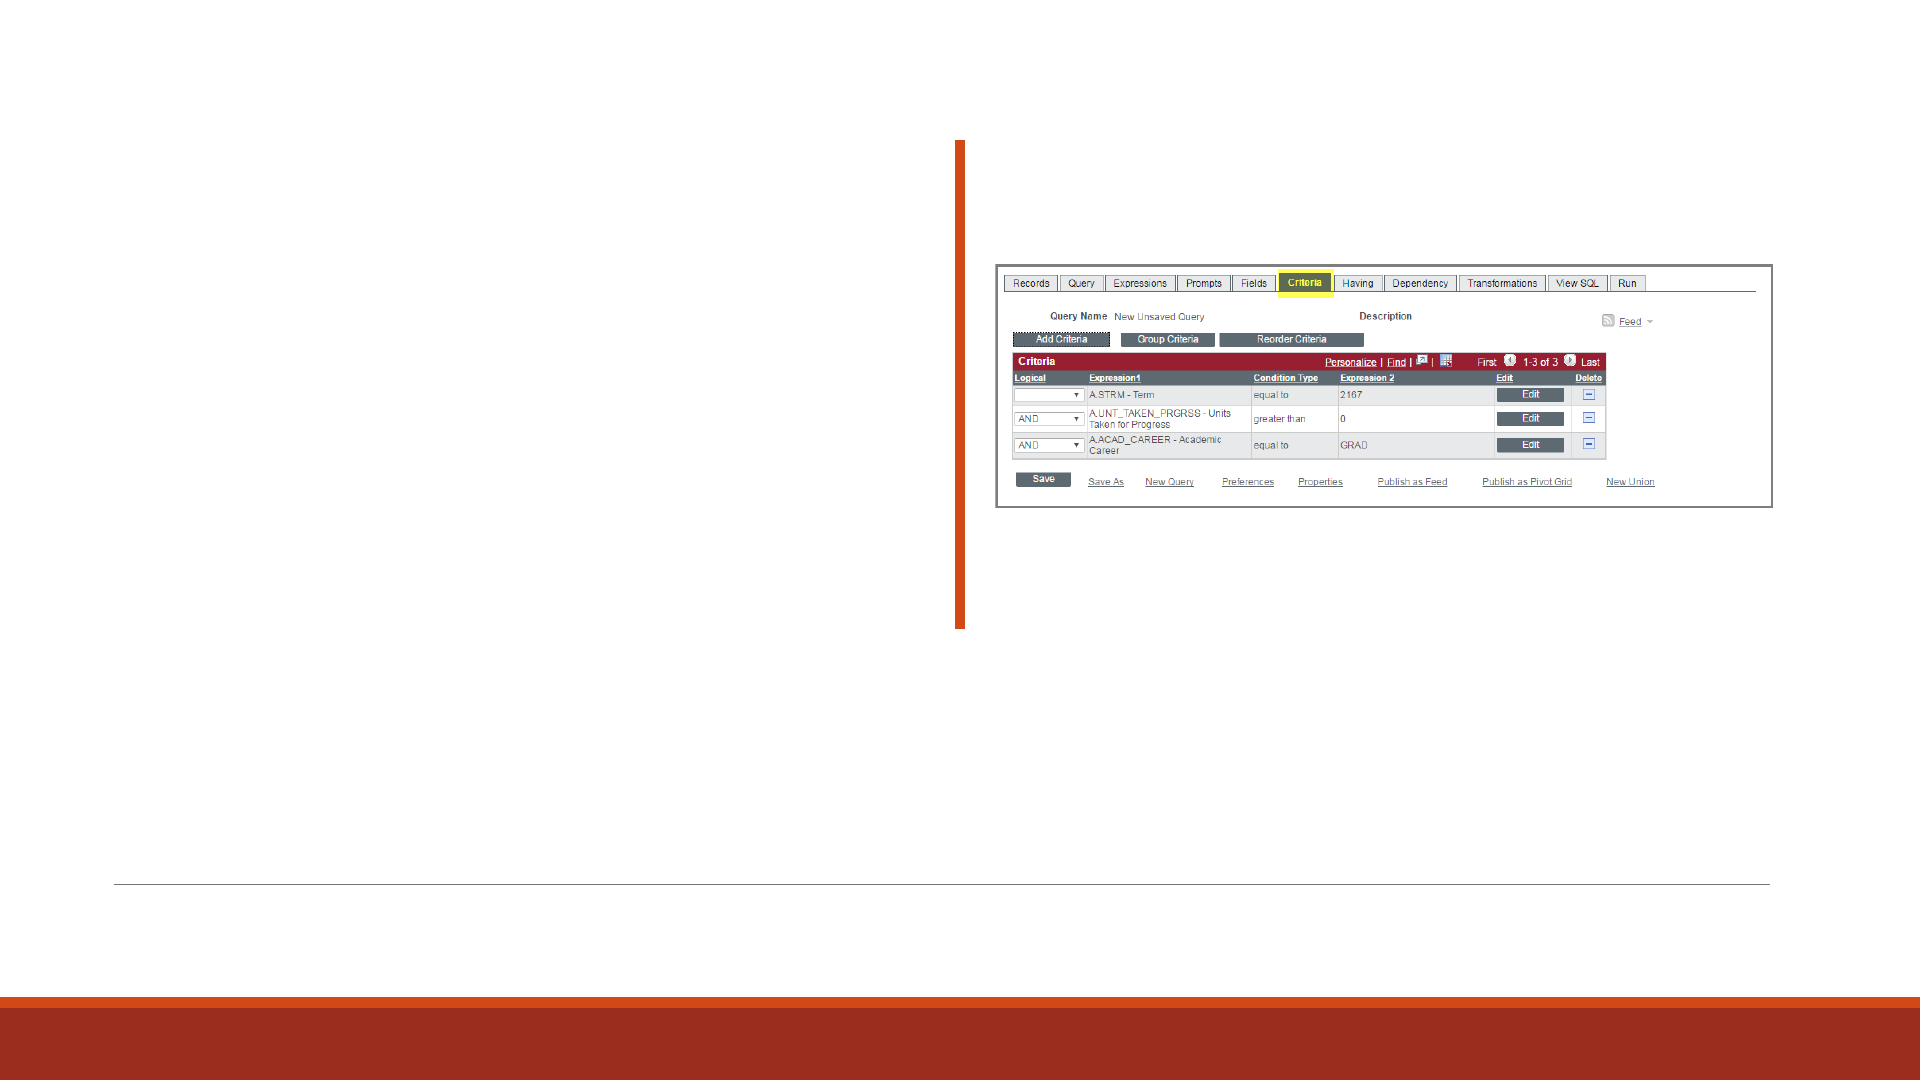
Start with your base query: Add the
STDNT_CAR_TERM record and define your
enrollment criteria:

Next, look up the PERSONAL_PHONE record.
We are going to outer join this record to
STDNT_CAR_TERM. When you click the “Join
Record” link, select the outer join option on
the next screen:

You should now notice a couple of differences
in your query. The first is on your Query tab:
the phone record has additional information
next to its name, indicating that it is outer
joined and which record it is joined to:

The second is on your Criteria tab. Any criteria
for outer joins has an additional column filled
in: “Belongs to”.
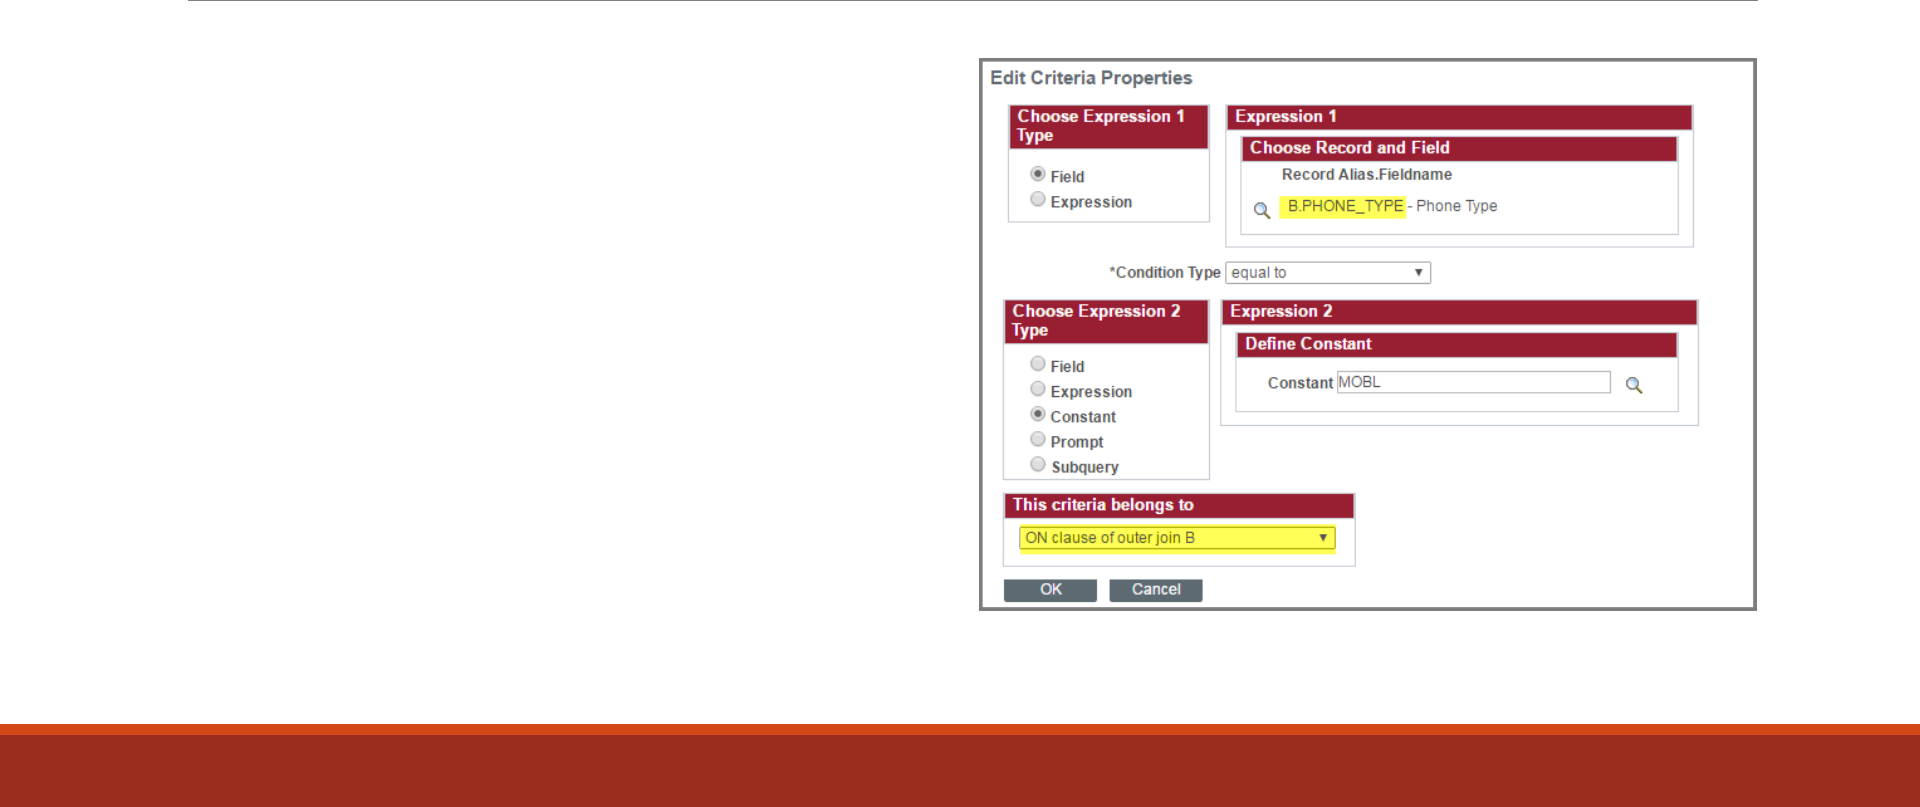
This new criteria column will become
important when we narrow our results. Go
back to your Query tab and add new criteria
on the PHONE_TYPE field in the phone record.
Since this is an outer join, you will have to
change the “belongs to” field at the bottom to
the same letter as the record (in our case,
since we are adding criteria to record B, the
criteria should belong to outer join B). Click
“OK”.
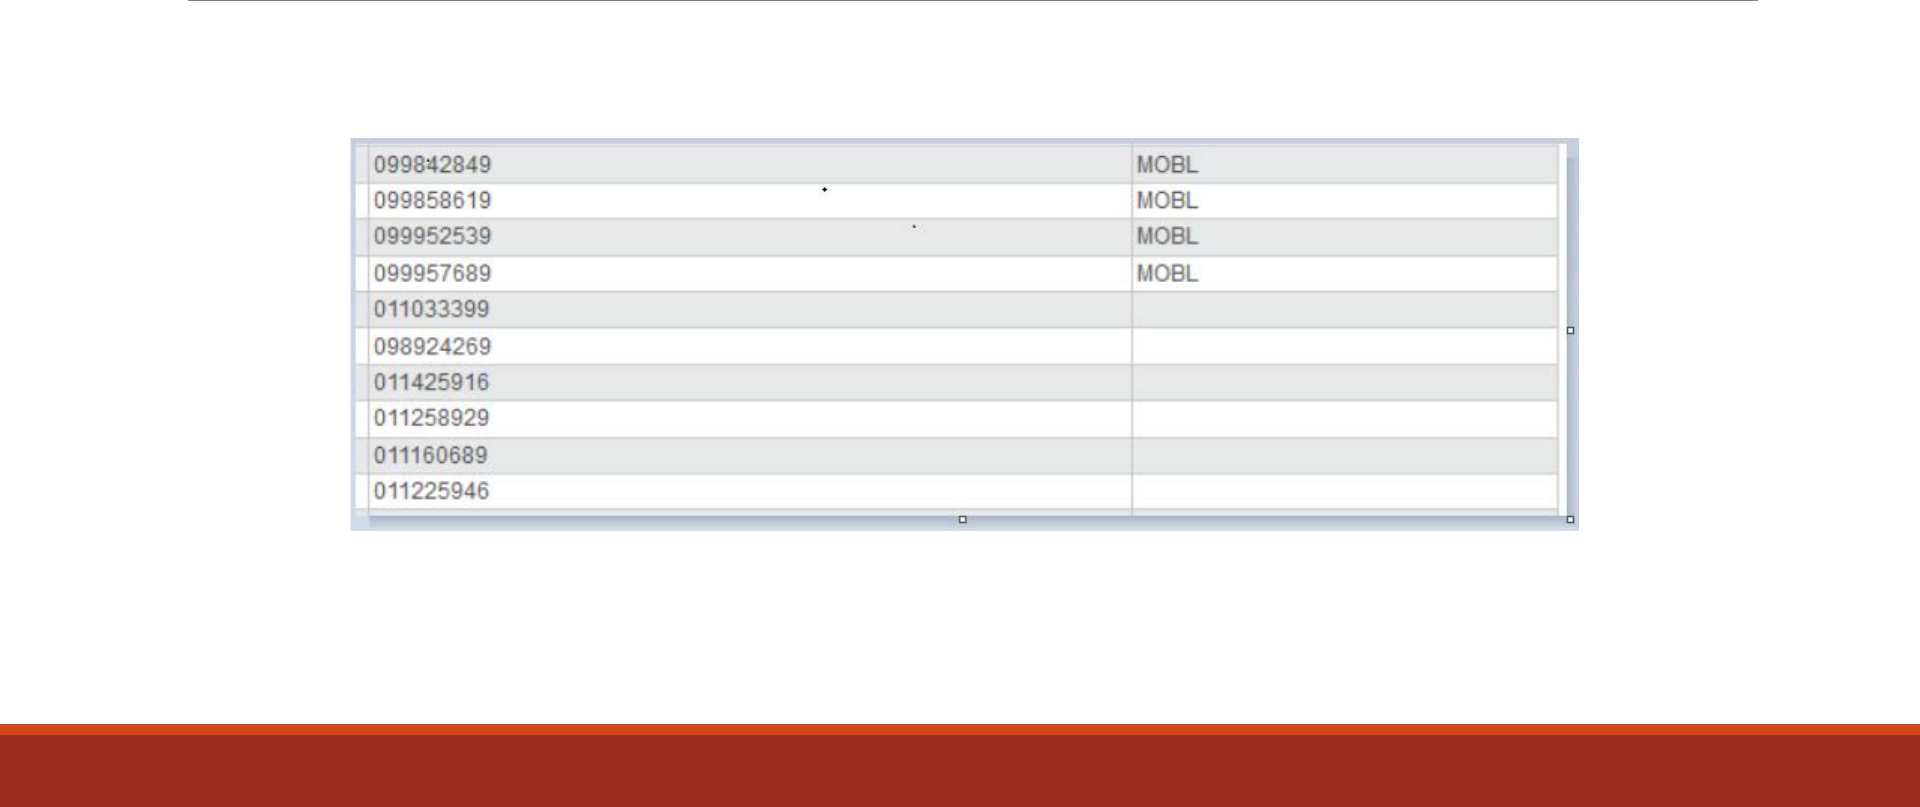
Correct outer join
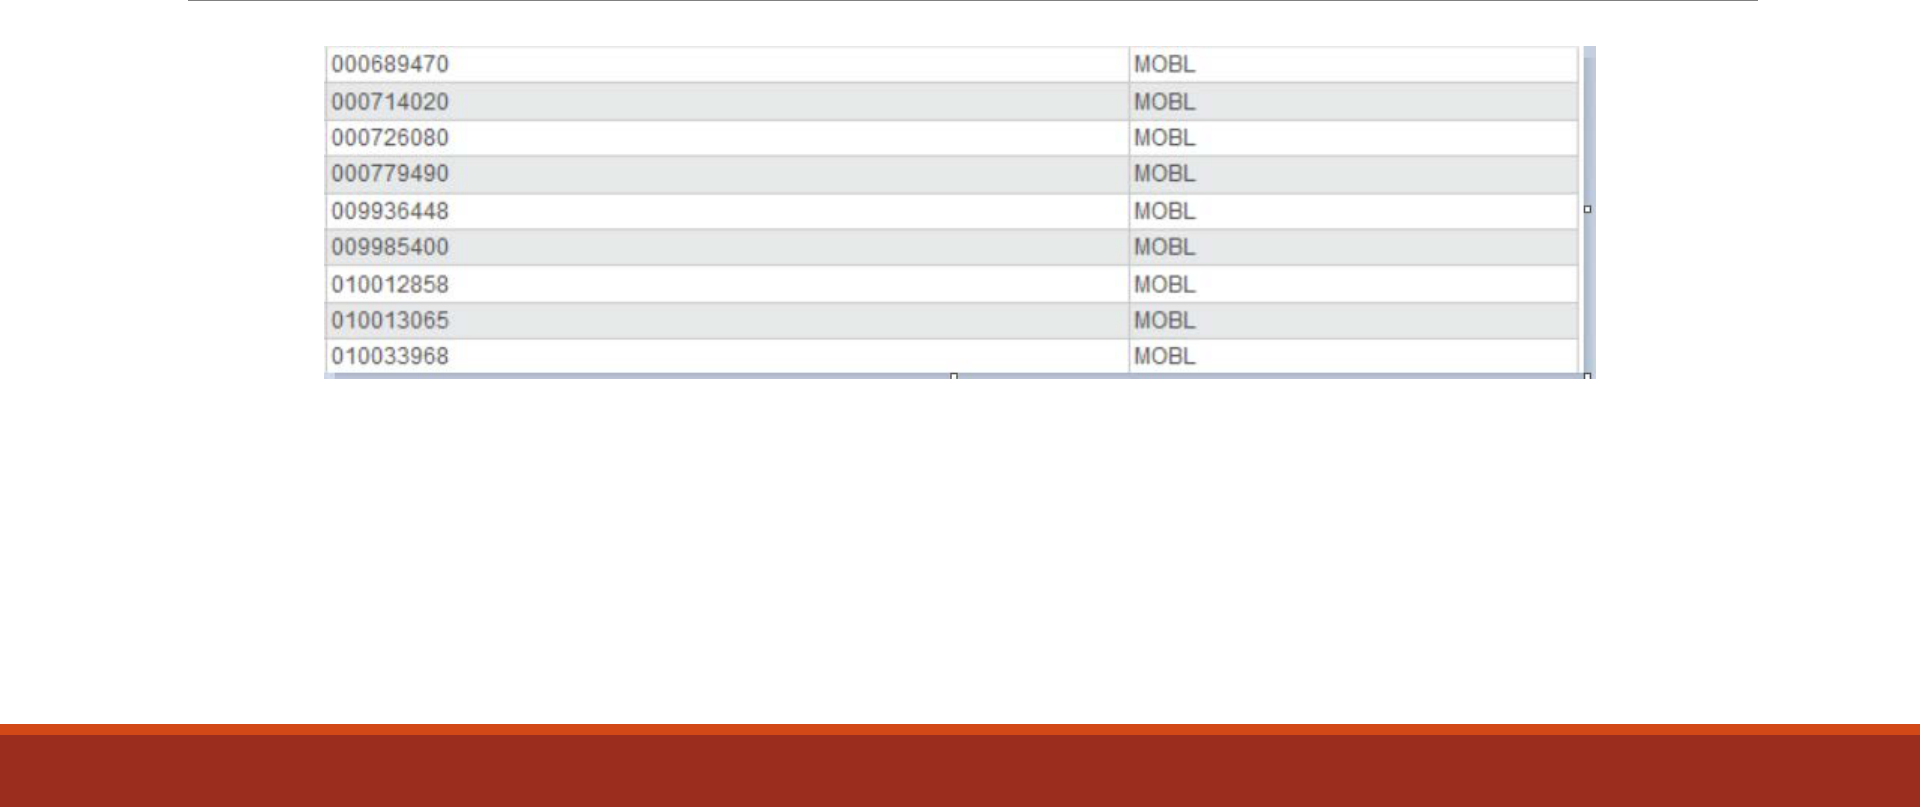
Criteria have been erroneously placed on
the WHERE clause.
Results incorrectly display only MOBL

Add Criteria to Your Left Outer Join
Adding Criteria to a Left Outer Join – Simplified Instructions
• Create a query that has a left outer join, select a field from the record which has been left
outer joined and add criteria to it, either from the Criteria tab or the Add Criteria icon.
• In the “Criteria Belongs To” box select the outer join clause that matches the record alias (for
example, Record B).
• Select fields from both records.
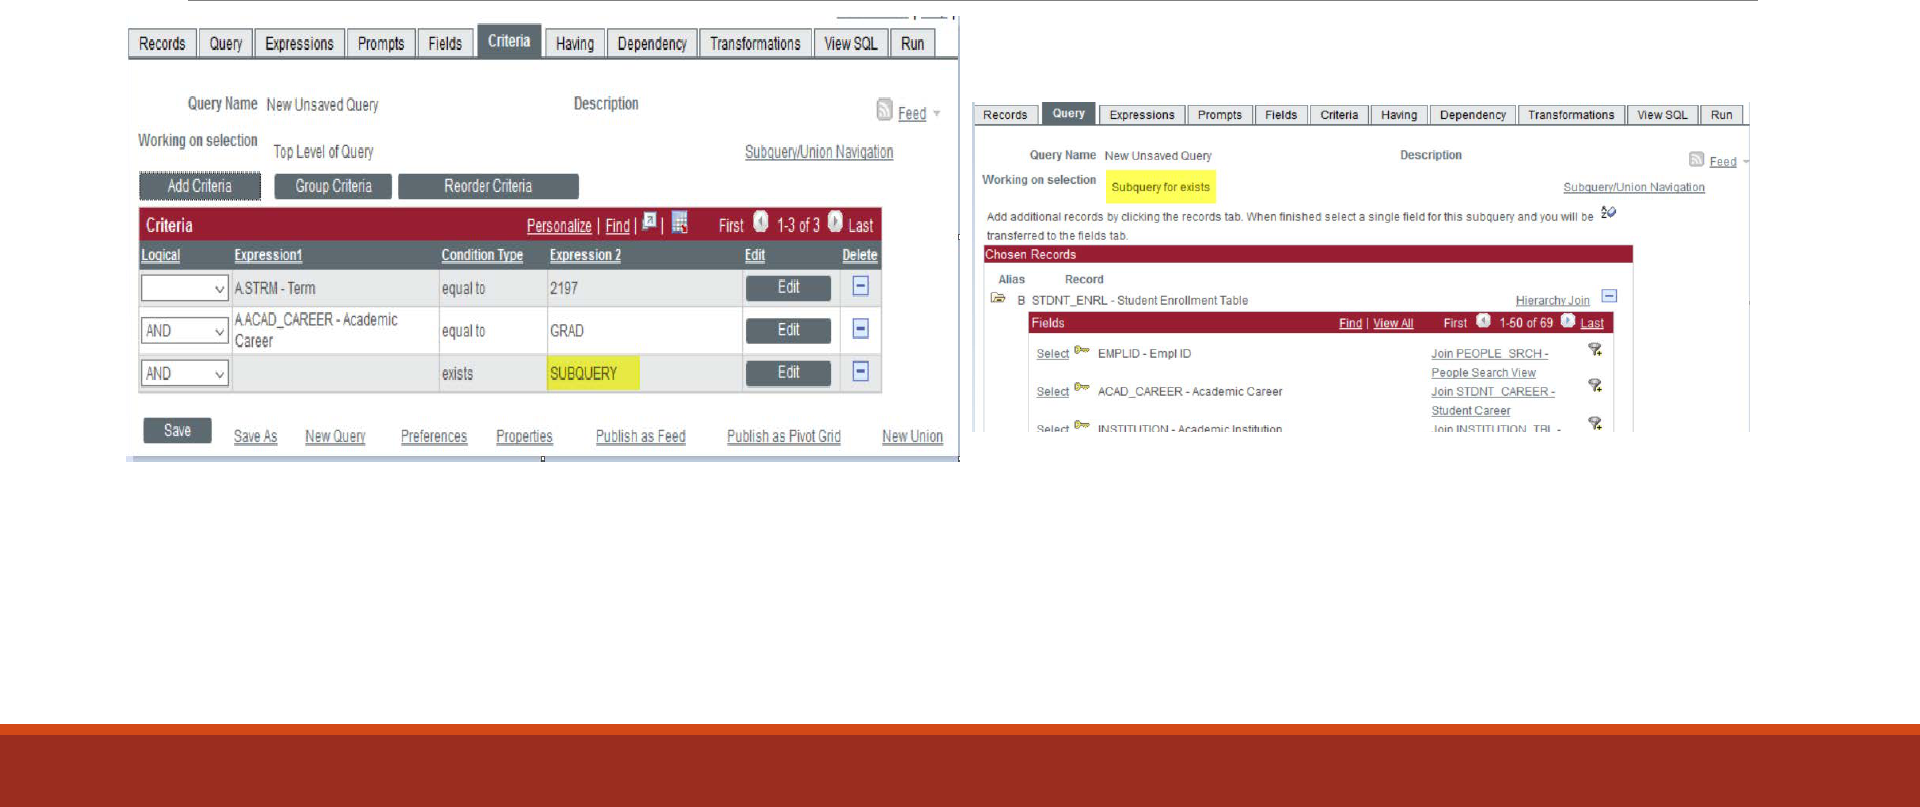
SubQueries
Criteria page when you are using a subquery
Query page when you are creating a subquery
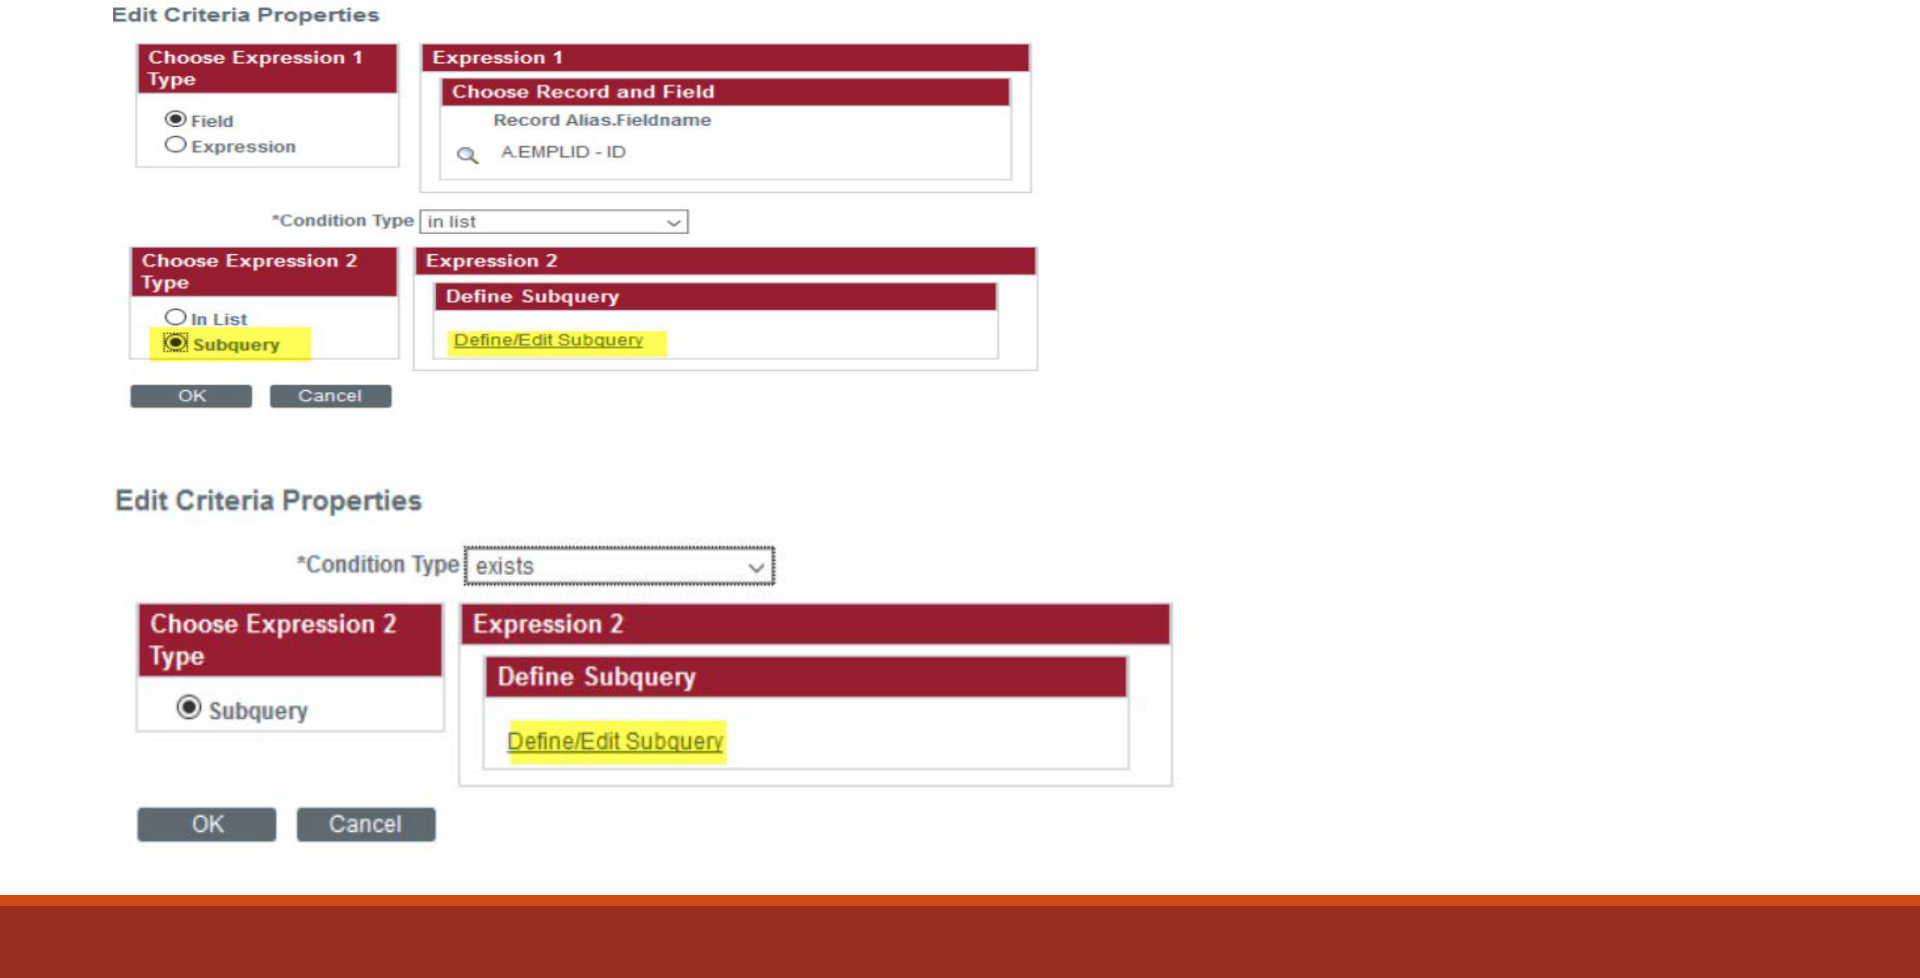
2 common types of criteria
conditions for sub-queries.
1. Using in list
2. Using exists which does not
require using a field.
The 2 look very different.

Expression Basics
Step 1: Create literal value as a column
Expression Operator Basics
Delimiter Meaning
+ Addition operator
‘ Character string
delimiter
|| Concatenation operator
/ Division operator
( Expression or list
beginning delimiter
) Expression or list end
delimiter
, Item Separator
= Relational operator
(equal)
Delimiter Meaning
<> Relational operator (not
equal)
< Relational operator (less
than)
> Relational operator
(greater than)
<= Relational operator (less
than or equal)
>= Relational operator
(greater than or equal)
;
Statement terminator
-
Subtraction operator
*
Multiplication operator
Expressions
Expressions are calculations that PeopleSoft
Query performs as part of a query. Use them
when you must calculate a value that
PeopleSoft Query does not provide by
default—for example, to add the values from
two fields together or to multiply a field value
by a constant.
Use Expressions in two ways:
•
As comparison values in selection criteria.
• As columns (fields) in the query output.

Expression Basics
Example: Translating Values
Sometimes, all you want to know is “Does this
person have something in this field or not?” or
“What does this funny combination of numbers
and letters mean in plain English?” You don’t
care about the details that the system stores; you
just want something that you can glance at and
easily make sense of. The following will allow you
to create an expression that will “translate” the
system values into something that you, the query
writer, define.
Suppose we wanted to look at
STDNT_CAR_TERM and count the number of
students enrolled in each class standing
(freshman, sophomore, junior, etc.) for Fall 2016.
Create your new query with STDNT_CAR_TERM
and add your fields:
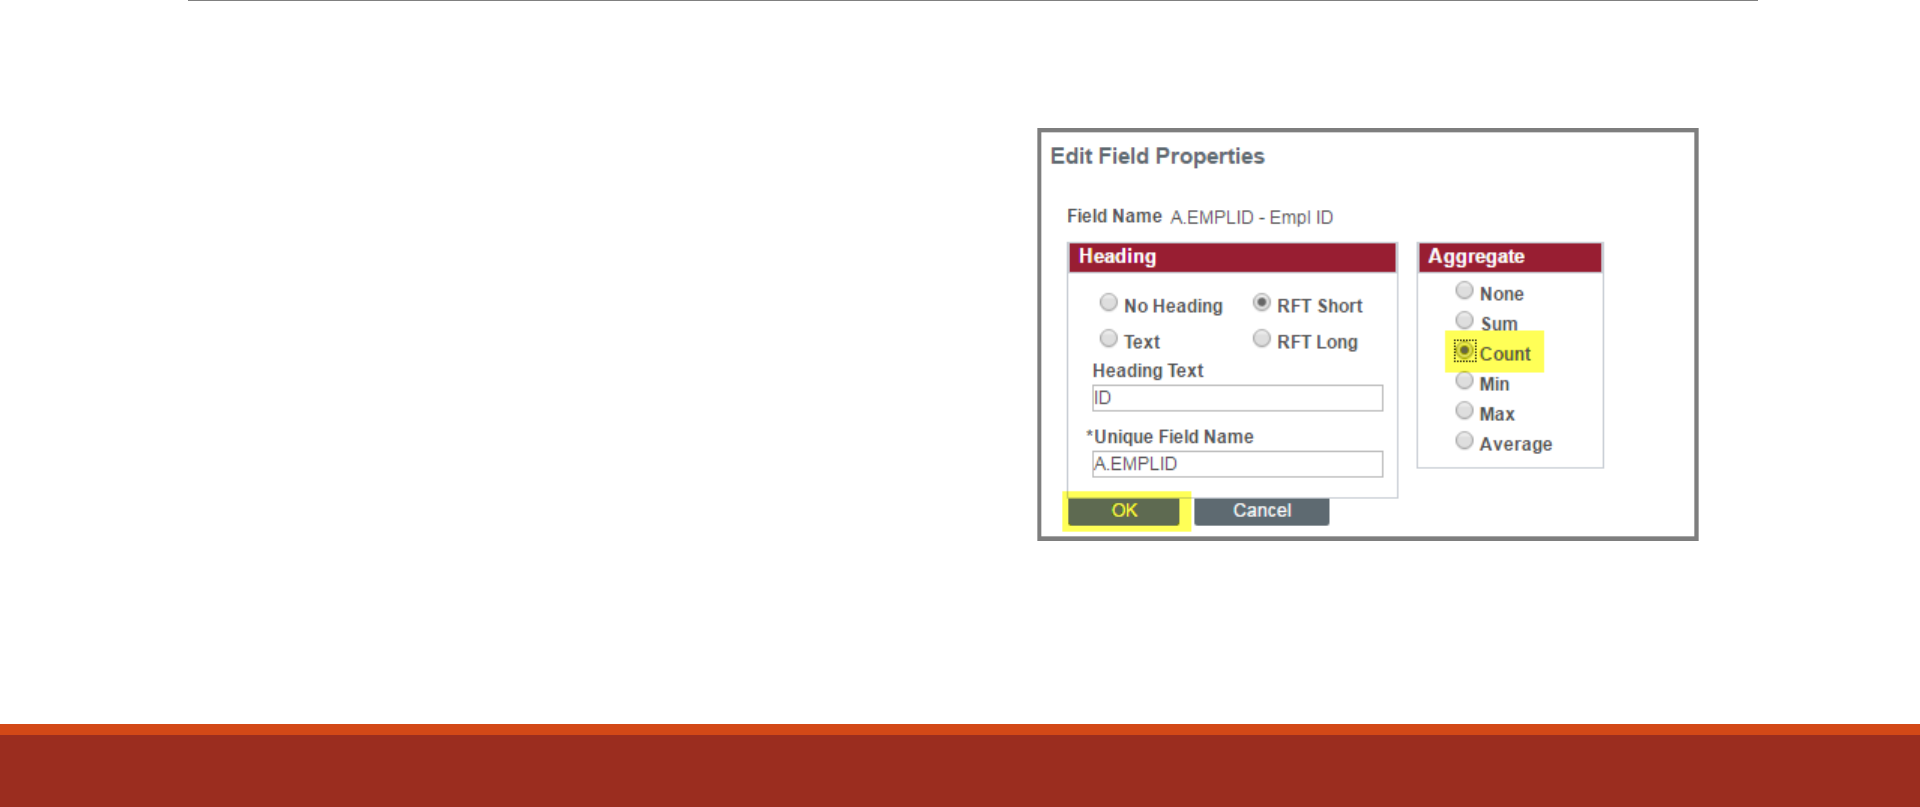
Click the “Edit” button next to the EMPLID
field and apply the count aggregate function

Next, add your criteria:

Case statement
If you run your query now, the academic level will read
“10”, “20”, “30”, and other values that may not make
much sense unless you know what each value
translates to. Our job is to translate these values for
the user, so that they don’t have to do it themselves.
Doing this can make the query easier to read at a
glance.
For most queries, you will want to remove the field
that you are translating from the query. There’s no
need to have both the old, hard to read stuff and your
new stuff. For the sake of the example, however, keep
it in if you want to see the “before and after” contrast.
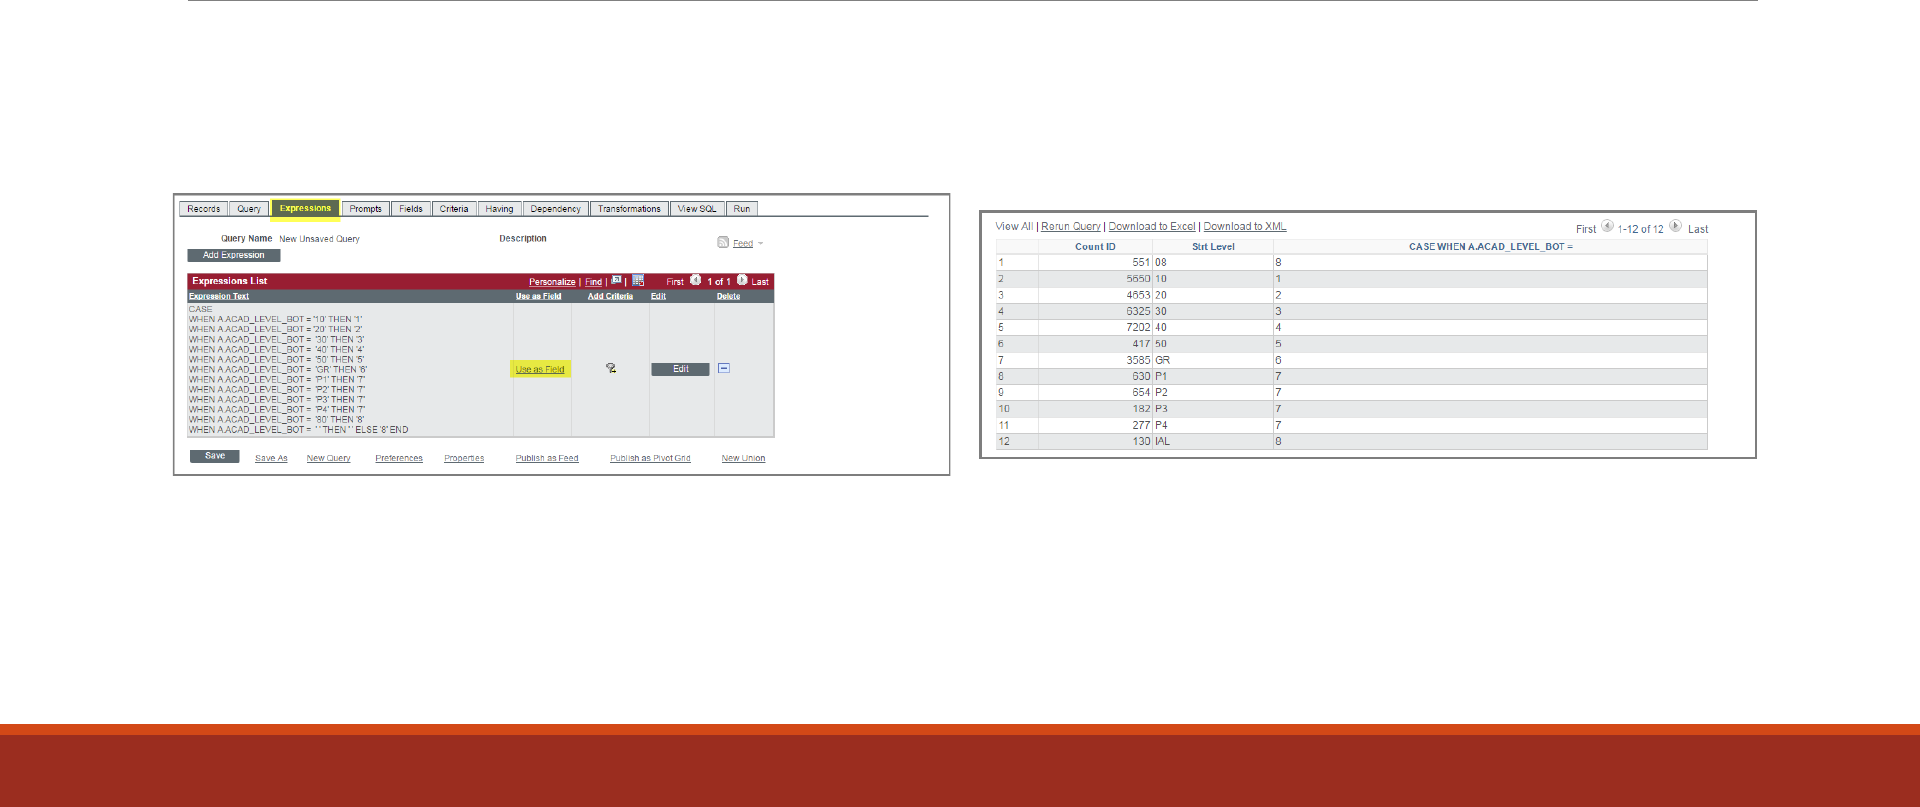
Head over to the Expressions tab and add a new
expression.
The easiest way to translate our system values is
through a CASE statement expression. They are written
like this:
CASE
WHEN A.FIELDNAME = ‘system value 1’ THEN ‘your
value’
WHEN A.FIELDNAME = ‘system value 2’ THEN ‘your
value’
ELSE ‘default value’
END
Expression Basics
Numeric Step 2: Use field as a column in the result set

Using Expressions vs Criteria
Advanced Functions
Function Usage Example Result
NVL Allows you to substitute a value when
a NULL value is encountered.
Example 1: NVL(SUPPLIER_CITY,
‘Please Complete’)
If Supplier City is populated this will
return the city name, if NULL it will
return ‘Please Complete’.
NVL2 Extends the functionality found in the
NVL function. Substitute a value when
NULL is encountered as well as when a
non-NULL value is encountered.
Example 1: NVL2(SUPPLIER_CITY,
‘Completed’, ‘Please Complete’)
If Supplier City is populated this will
return ‘Completed’, if NULL it will
return ‘Please Complete’.
ROWNUM Assigns a number indicating the order
in which each row is returned by a
query.
ROWNUM 2931
ROWNUM Limits the number of rows returned in
a result set.
ROWNUM < 10 Returns 9 rows of results.
CASE Performs the functionality of an “IF-
THEN-ELSE” statement
CASE
WHEN condition_1 THEN result_1
WHEN condition_2 THEN result_2
ELSE result
END
CASE
WHEN A.ACAD_CAREER = 'UGRD'
THEN 'Undergraduate Student'
WHEN A.ACAD_CAREER = 'GRAD'
THEN 'Graduate Student'
ELSE 'Check Career'
END
Undergraduate Student

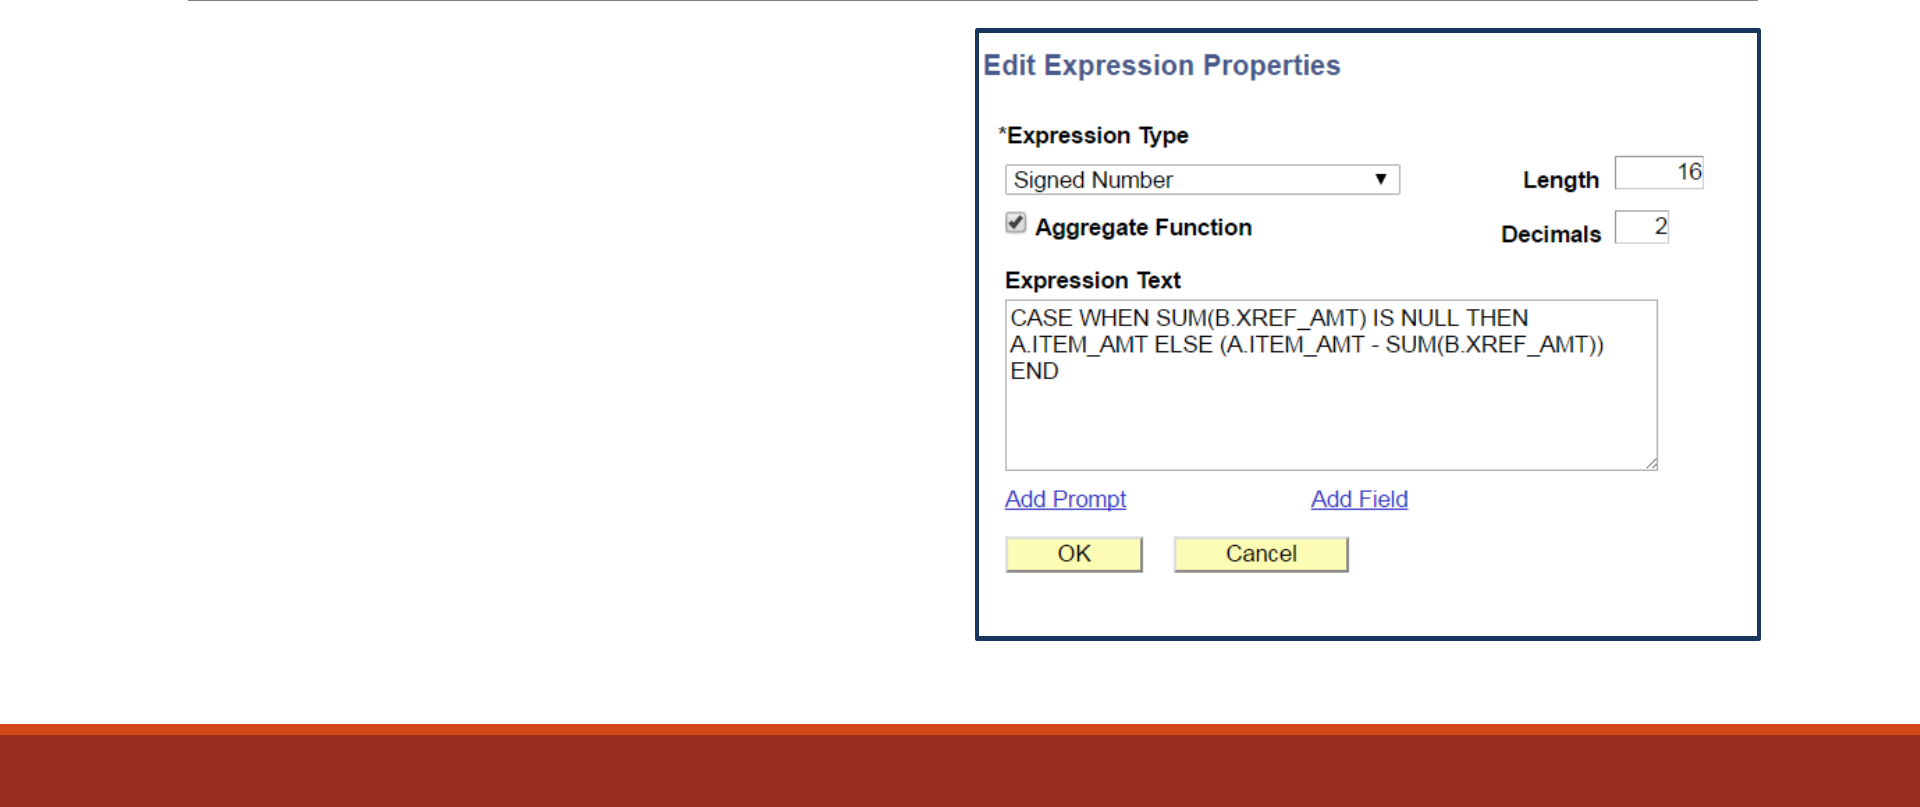
Expression Gotchas
Case statements –
When there is a possibility of not meeting your
specified condition(s) which can cause multiple
rows to be returned for the same entry. To get
around this you can use Aggregates such as
minimum or maximum to specify which value you
want to return.
ROWNUM – this is not an absolute value so if you
specify a ROWNUM not greater than 200 you
may for example get 210 rows.
Any time you are working with number there is a
potential for data distortion. You can get around
this by using a sum or count expression but that
may also eliminate rows that you may need.
There are a few cases where you can still get
incorrect data using this type of expression. An
example is when data distortion occurs in the
STDNT_AWRD_DISB record, where a student has
multiple disbursements of the same dollar
amount. The DISTINCT keyword will keep the first
row but discard all others, resulting in a dollar
amount that is too small. Be on the lookout if you
think that this type of error is a possibility in your
query. Removing the DISTINCT from your
expression will bring back the data distortion, so
there is no way around this issue.
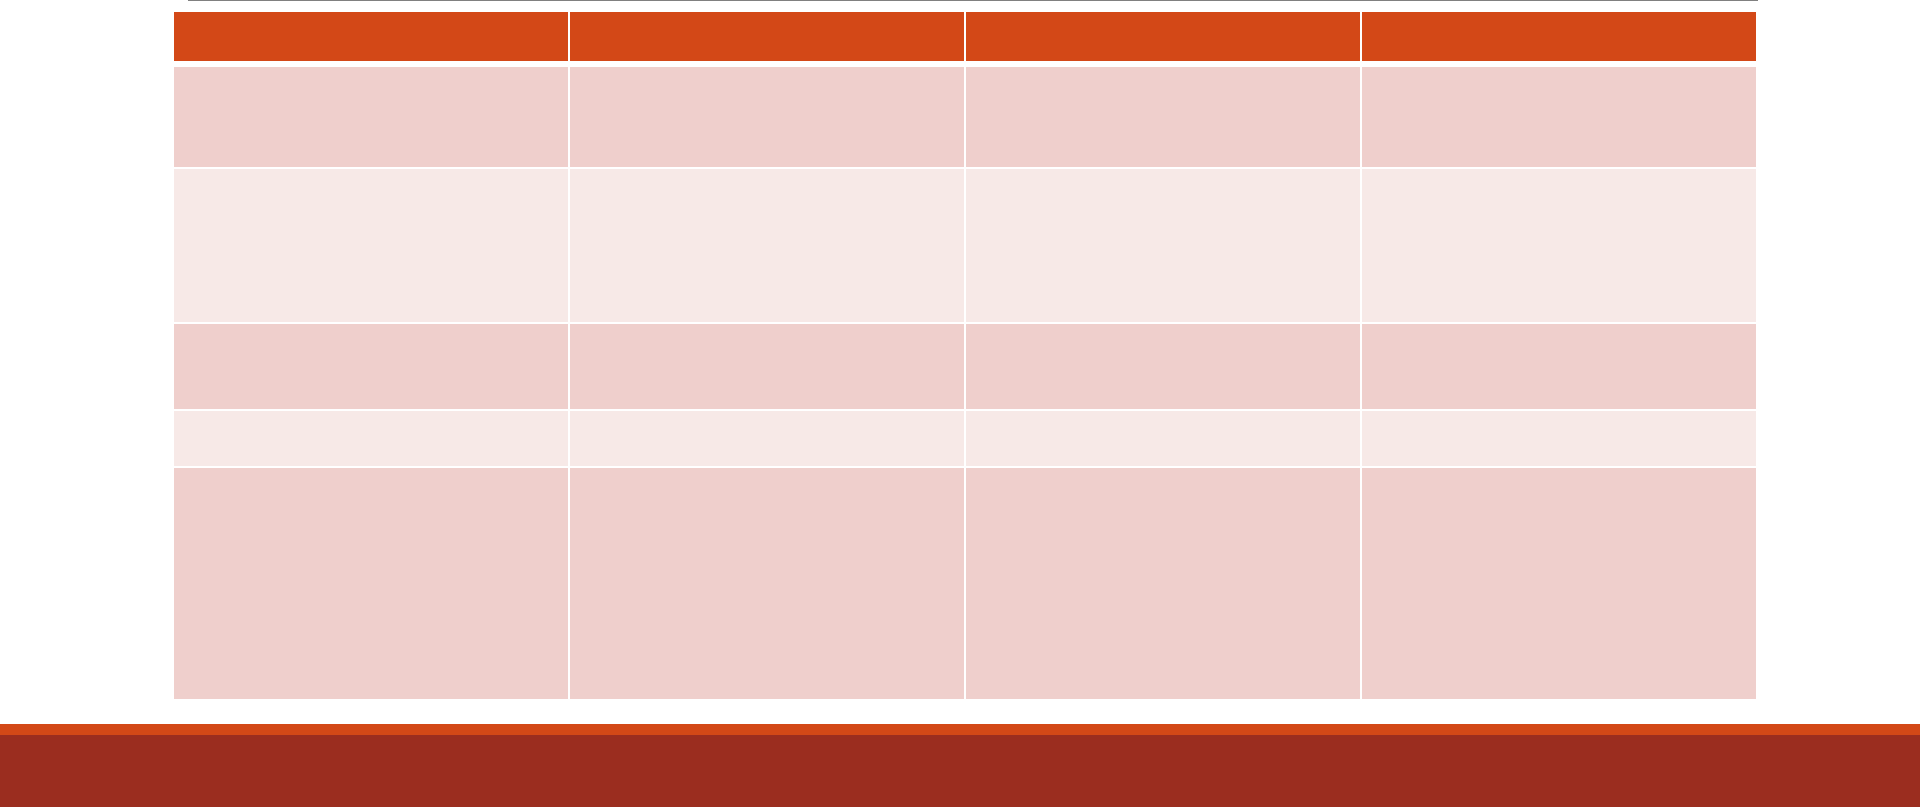
Bind Records

Pop Select Query Protocol
Pop Select Queries have the following protocol:
1. Identify the Query/Batch Process relationship. If unsure what the relationship is submit a ticket to
Enterprise Systems to ensure that the correct Query is tied to the correct process or look at a query that
is already using a BIND record to see what it is using.
2. All key fields in the BIND record must be displayed in the Query results.
3. Only display the BIND record key fields in the Query results. a. In some batch processes if any other
column is displayed besides a BIND record key field it will cause the process to fail. If it is desired to use
the Pop Select Query for data values in addition to its use in the batch process it is recommended to
create two separate Queries.
4. Always include POP or POPSEL in the Query name at the end of the Query. For example,
WSU_SF_MIS_NATID_POPSEL.
5. Describe the Query as a Pop Select Query in the description.
6. Provide a full Definition, including the batch process the Query is tied to.
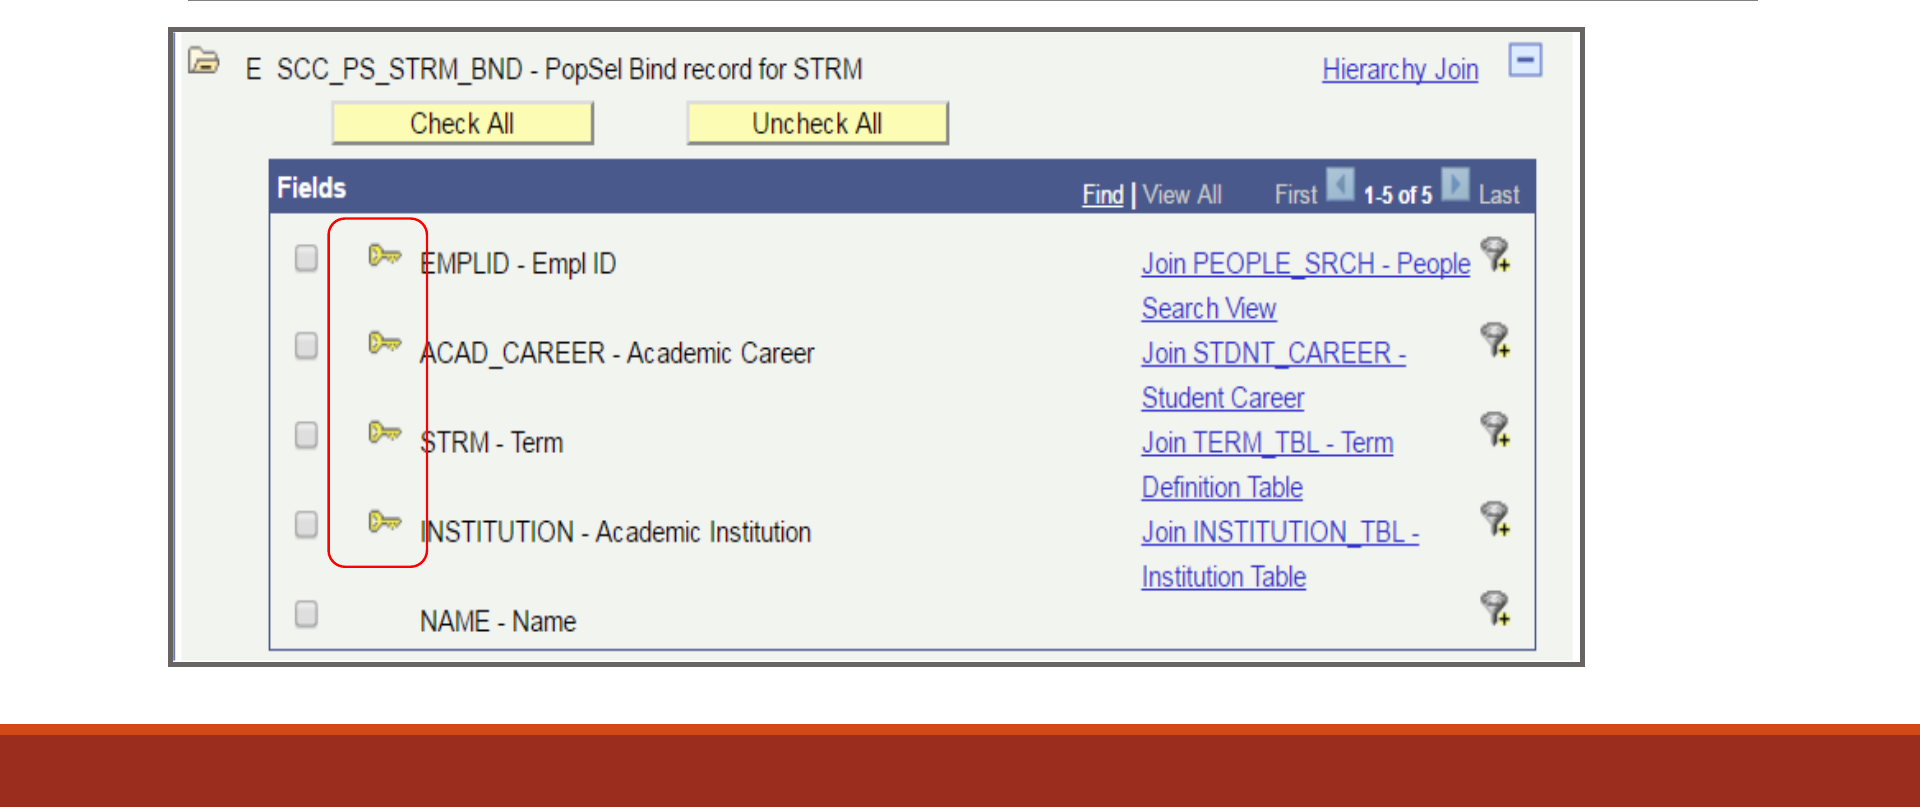
Aggregates Function

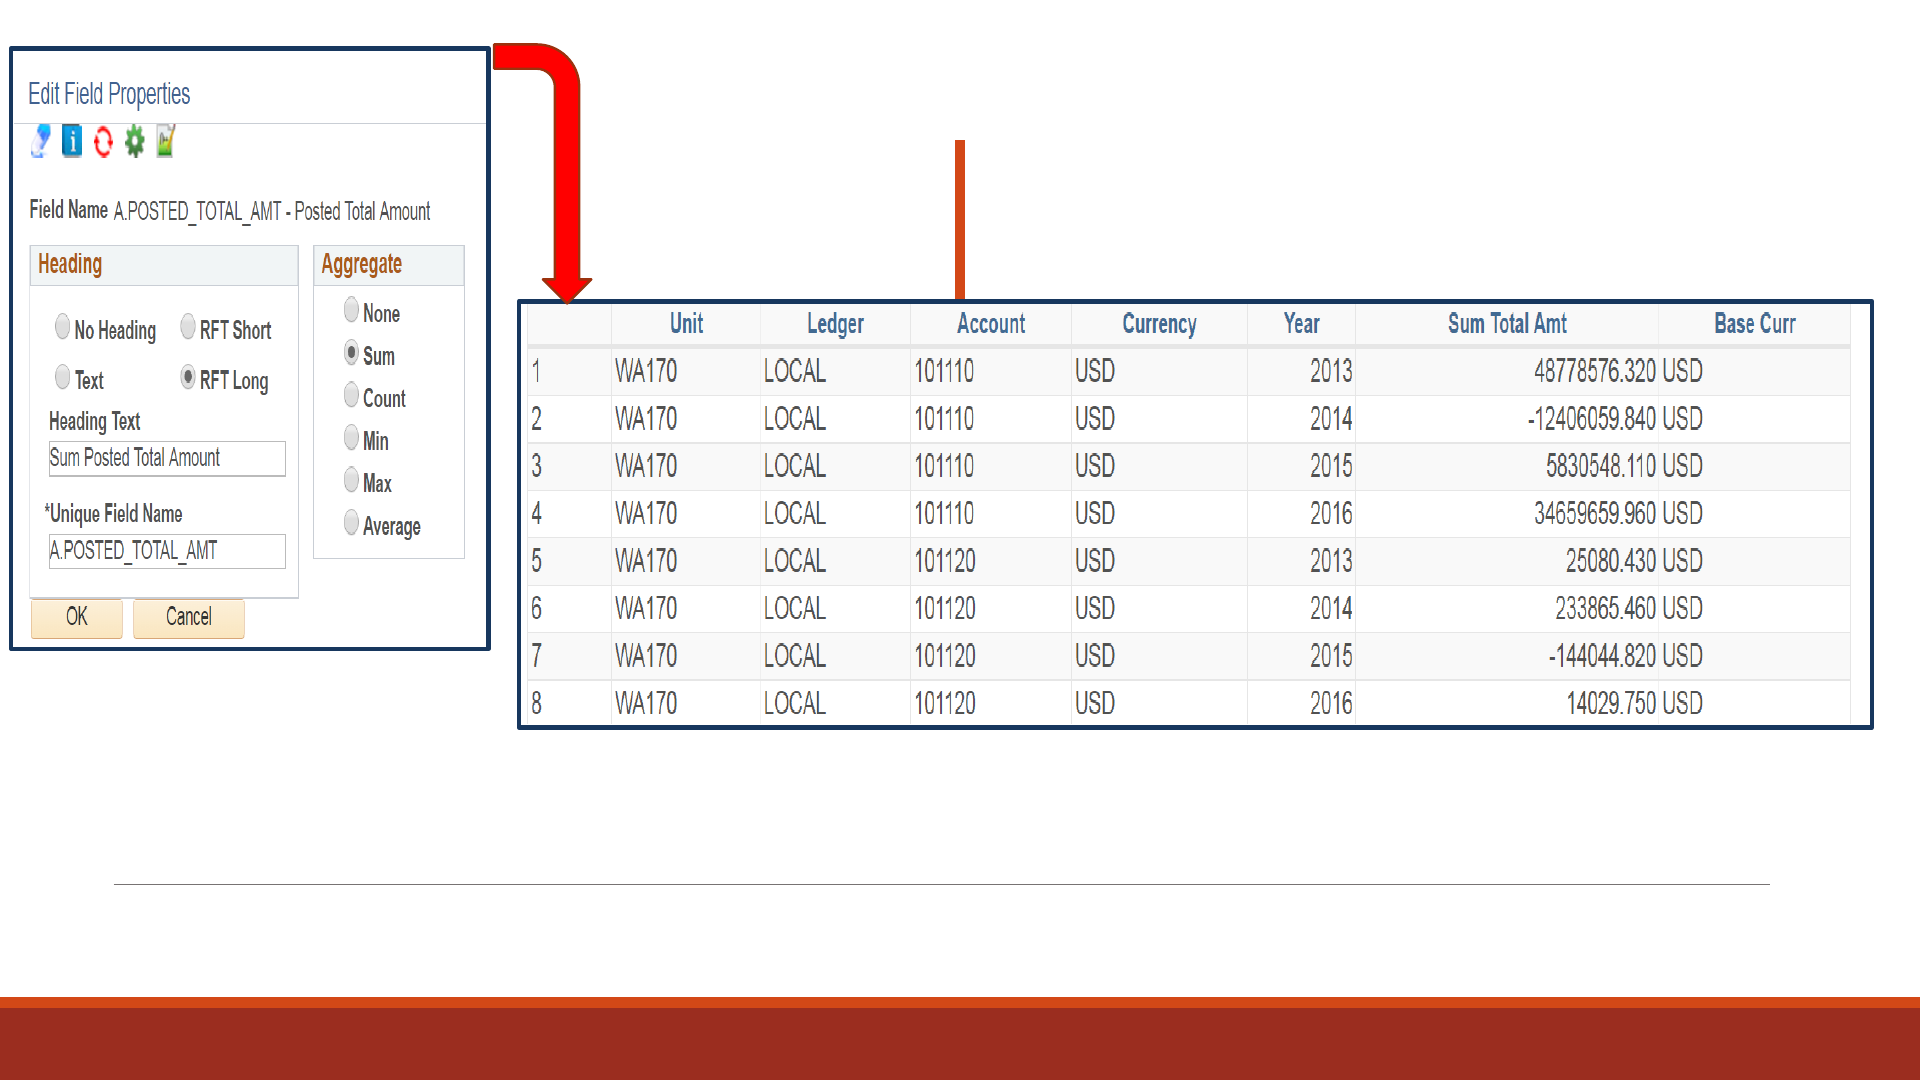
Having
Having Criteria Tab

Create
Your Own
Query!
