IMPORTANT: KEEP THIS INSTRUCTION BOOKLET IN THE
PLACE PROVIDED ON THE CHILD RESTRAINT
Bugaboo child restraint in
collaboration with Nuna
Bugaboo Turtle by Nuna
INSTRUCTIONS FOR INSTALLATION
BUGABOO SEAT AND BASE ITEM NUMBER 84701ZW01
/ BASE ONLY 84702ZW01
NUNA SEAT AND BASE MODEL NUMBER CF05703
/ BASE ONLY IF05701
IMG-0107D
INSTALLATION
Bugaboo turtle by Nuna is based on the Nuna KLIK plus model
bugaboo cameleonbugaboo fox bugaboo bee bugaboo donkey bugaboo lynx
when used with additional Bugaboo adapters for
designated bugaboo strollers, compatible with:
nothing like a Bugaboo
1
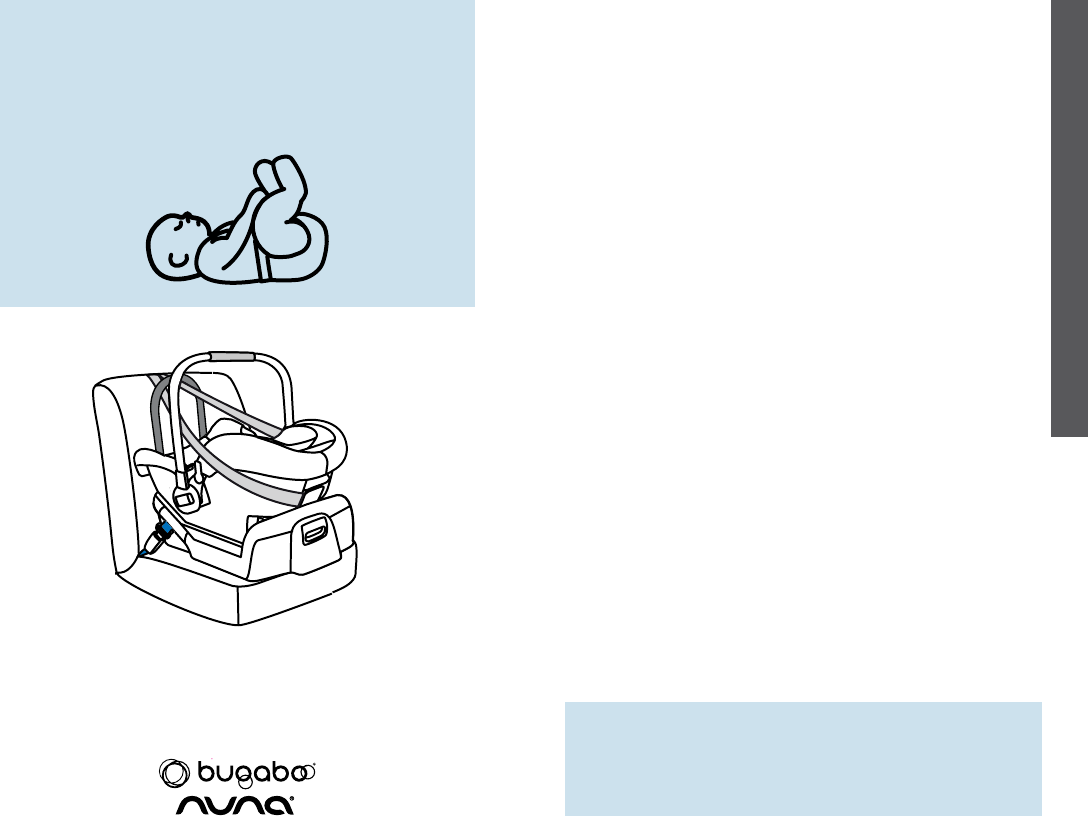
INSTALLATION
IMPORTANT: This is a rear facing child restraint. Do not face forward.
Distributor: Bugaboo Australia Pty Limited,
suite 2, level 2, 156 Edgecliff Road, Woollahra, NSW 2025
For after sales service: Bugaboo.com/support
[email protected] 02 9091 0322
IMPORTANT:
Before installation and use of this child restraint
check that it is suitable for the size of your child.
See pages 4 & 7 of the USE Instructions.
DO NOT USE THIS CHILD RESTRAINT UNTIL YOU HAVE
READ AND UNDERSTOOD THE INSTRUCTIONS IN THIS USER
GUIDE AND IN YOUR VEHICLE OWNERS MANUAL
Contents
Quick Reference 2
WARNINGS 3
Additional Warnings 4
Features 6
Installation - General 7
Installation - Vehicle Belts 9
Checklist - Vehicle Belt Installation 11
Installation - ISOFIX Compatible Connectors 12
Checklist - ISOFIX Installation 17
Fitting Restraint to Base 18
WARNINGS – Tether Strap 19
How to use the Tether Strap 20
Installation – Tether Anchorage 23
Use with Strollers 26
Cleaning and Maintenance 27

32
INSTALLATION
INSTALLATION
Vehicle Belt (if used)
must always be secure
and pulled tight.
See pages 9 –11
Carry Handle
must always be locked
into position.
Tether Strap
must always be used when the
restraint is installed in a vehicle.
Store end of tether in bag.
See page 20 - 22
Base Recline Adjustment
base must be reclined correctly
See pages 7 & 8
Secure Latching
restraint must be
securely latched
into base.
See page 18
54
INSTALLATION
INSTALLATION
TO BE USED WITH A LAP-SASH/LAP ONLY SEATBELT
OR ISOFIX LOW ANCHORAGES IN THE BACK OF MOST
CARS WITH FORWARD FACING SEATS.
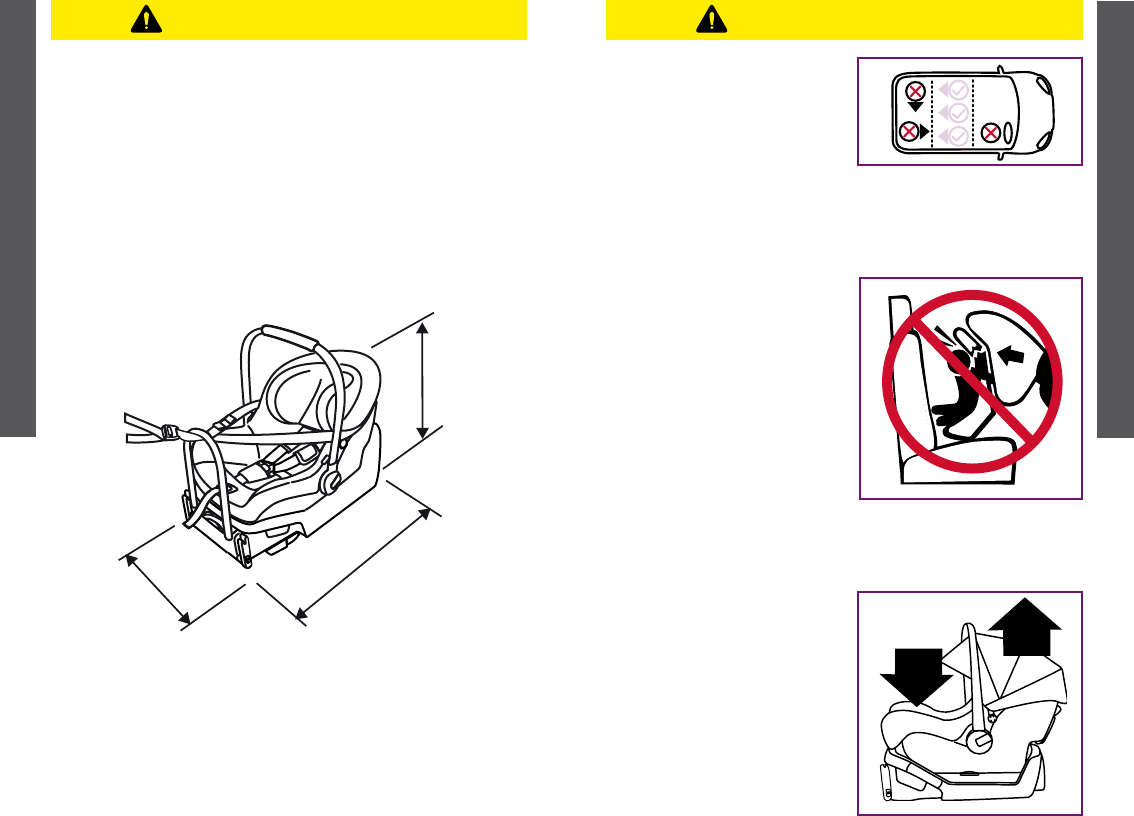
This restraint is 700 mm long, 440 mm wide and 500 mm
high (with the handle down). Check the measurement
between the front of the seat back of the rear seat and all
front seats in the car in which the restraint is intended to
be used to ensure the space available is sufcient.
Seat belt extenders are not recommended if the car seat
belt is too short to secure the child restraint. If the car
seat belt is too short get advice from a child restraint tter
regarding use of these.
ADDITIONAL WARNINGS
Never install the Child
Restraint in a seat with a
front airbag. DEATH or
SERIOUS INJURY may
occur. Refer to your vehicle
Owners Manual for airbag
warnings and information.
Only install child restraint
in a forward facing vehicle
seat. Never install in a seat
that faces the rear or the
side of the vehicle.
This is a rearward facing
child restraint. Do not install
facing the side or forwards.
ADDITIONAL WARNINGS
Always check child restraint
to base connection.
CLICK
1
2
CHECK
500
700
440

76
INSTALLATION
INSTALLATION
INSTRUCTIONSINSTRUCTIONS
3
2
Features
1
4
10
8
7
1 Tether Strap
2 Child Restraint Release
Lever
3 Tether Strap Anchorage
4 Tether end storage
5 Vehicle Belt Lock-Off
6 Bubble Level Indicator
7 Instruction Manual
Storage
8 Recline Foot
9 ISOFIX connector
10 Recline Foot Fold Latch
11 ISOFIX connectors fold
latch
6
11
9 9
9
5
Where to install the child
restraint?
Only install the child re-
straint in a forward facing
vehicle seat.
Never install in a seat that
faces the rear or the side of
the vehicle.
Install in the rear seat, the
safest place is normally the
centre.
The base can be installed
on vehicles seats tted with
either a lap belt or a lap/
sash belt or ISOFIX anchor-
ages.
To install correctly the
vehicle must be on a level
surface.
IMPORTANT:
Correct position and
installation is essential
for your child's safety.
Installation - General
98
INSTALLATION
INSTALLATION
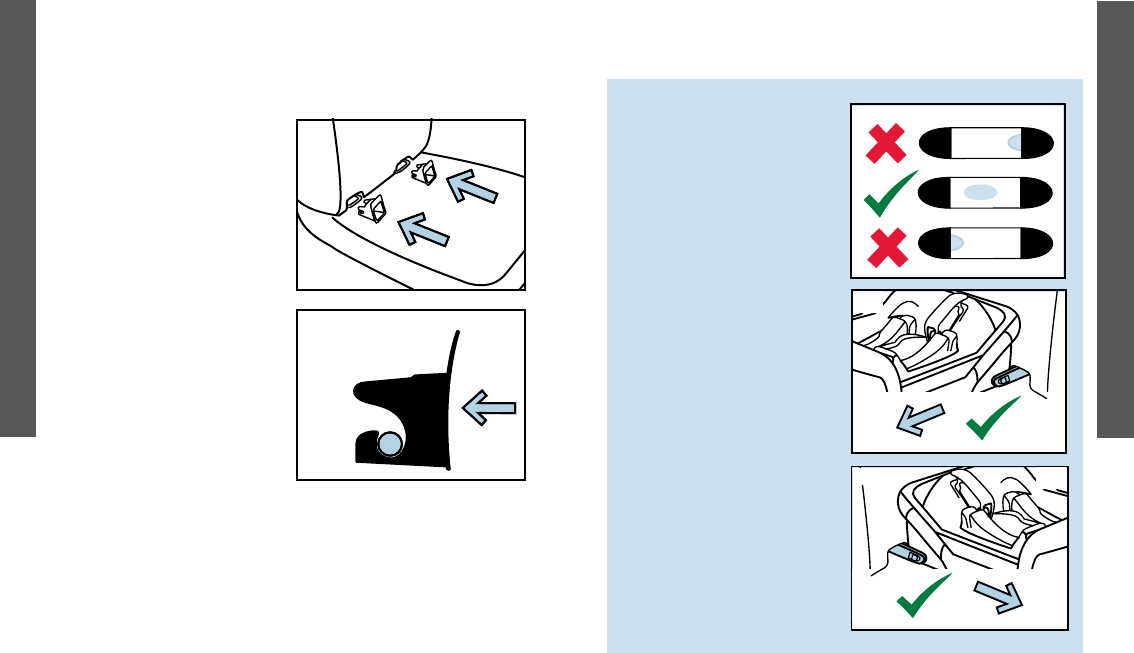
1
1 Position base on a
forward facing vehicle
seat.
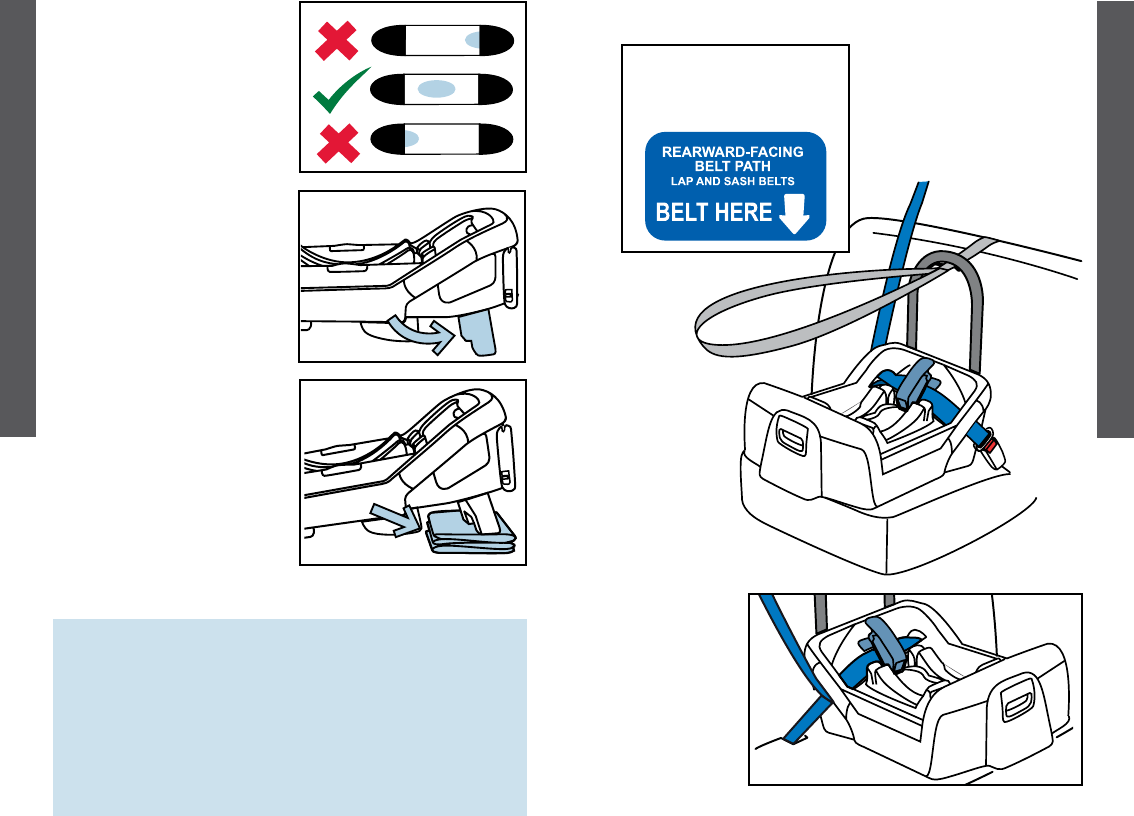
Adjust base so bubble
is between the black
patches.
2 Use recline adjustment,
if needed, to achieve
correct angle for
installation.
Recline adjustment foot
snaps into position.
3 If the recline adjustment
foot does not give
sufcient recline, add a
folded towel or similar.
3
2
IMPORTANT:
Any extra padding
placed under the base
must be firmly folded so
that when the vehicle
belts are pulled up tight,
the base is secure.
Always secure the base
with a vehicle belt, even
when the restraint is not
fitted to it. An unsecured
base may be dangerous
in an accident or sudden
stop.
Installation - Vehicle Belts
REARWARD-FACING
BELT PATH
INSTALLED
BASE
Use the Belt Path
labels as a guide for
correct belt placement.
1110
INSTALLATION
INSTALLATION
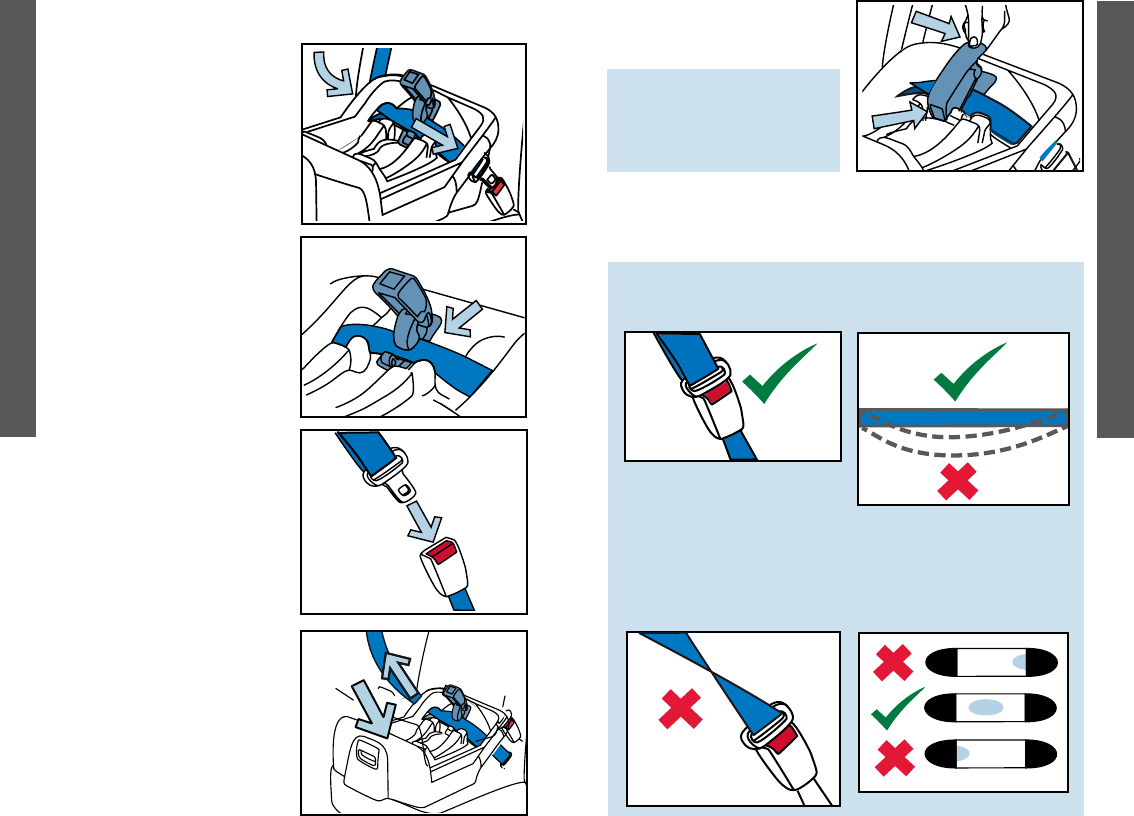
3. Buckle the vehicle belt.
2. Open the belt lockoff
and place the shoulder
and lap belts across it.
4. Push the base into the
vehicle seat rmly A and
pull the vehicle belts
tight B.
"CLICK"
3
4
A
B
2
1. Place the base on the
vehicle seat and pass
the vehicle belt through
the openings in the base
labeled ‘BELT PATH’
1
Installation - Vehicle Belts
5. Hold vehicle belts tight
and engage the belt
lockoff.
3. Vehicle belt is not
twisted.
4. Level indicator
bubble is fully in the
clear area.
2. Vehicle belt is tight.
2
Checklist — Vehicle Belt Installation
1. Vehicle Buckle
engaged.
1
5
4
3
BELTS MUST BE
TIGHT.
LOOSE BELTS ARE
DANGEROUS.
1312
INSTALLATION
INSTALLATION
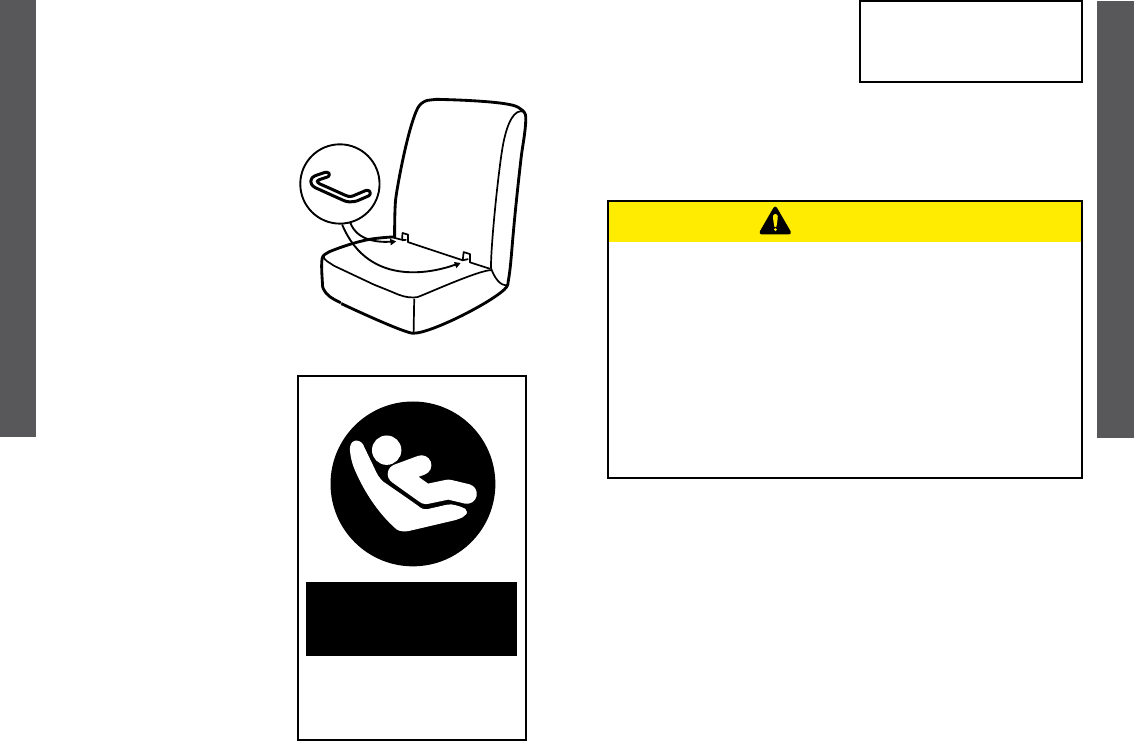
ISOFIX
Typical marking showing
location of ISOFIX low
anchorage points.
Installation - ISOFIX
Compatible Connectors
Some vehicles are tted
with ISOFIX low anchorage
points.
These are are found at the
bottom of the back seat
backrest.
This child restraint has
connectors to attach to
them.
If the ISOFIX low anchorage
points are not clearly
visible the vehicle seat will
be marked with labels to
show their location.
If in doubt that the vehicle
is tted with such points
check the Vehicle Owners
Manual.
LATCH
WARNING
IMPORTANT Do not attach the lower attachment
connectors of two separate child restraints to the
same ISOFIX low anchorage in your car.
Always attach the top tether strap to the child
restraint upper anchorage in your car.
Child restraint lower attachment connectors and the
ISOFIX low anchorages in your car are designed to
withstand only those loads imposed by a correctly
tted child restraint.
Some vehicles sourced from
the USA may be marked
LATCH.
ISOFIX and LATCH low
anchorage points are the
same.
1514
INSTALLATION
INSTALLATION
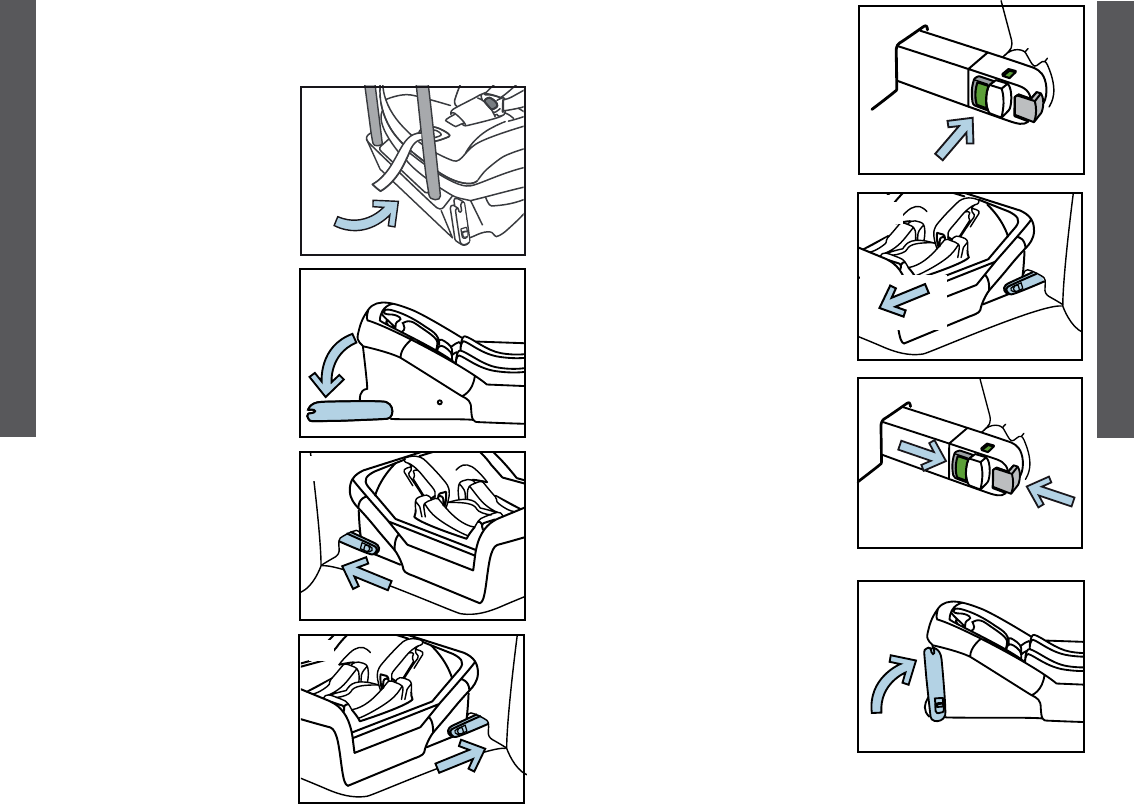
Installation - ISOFIX
Compatible Connector Guides
TO FIT:
1 Press the release button
under the front of the
base.
2. Swing the ISOFIX
compatible connectors
forward to their operating
position.
3 Attach each connector to
the vehicle ISOFIX low
anchorages.
Push rmly to connect.
Before fitting see general
installation instructions on
pages 7 & 8
3
1
2
3
5 Pull the base back to en-
sure both lower connec-
tors are engaged.
5
TO RELEASE:
6 Press both buttons
rmly. The connector will
release.
Pull the base back.
Storage
Store the ISOFIX compat-
ible connectors by swing-
ing them back until they
are snugly alongside the
base.
4 Indicator will show green
when connected.
4
6
Press both buttons
to release
1716
INSTALLATION
INSTALLATION
Checklist - ISOFIX Installation
1
Fit guide onto
steel rod
2
ISOFIX Compatible Connector Guides
1 Some models come with
guides for the ISOFIX
compatible connectors.
These are for use in cars
where the anchorage bar
is recessed a long way
into the seats.
Once tted they will
help guide the ISOFIX
compatible connector
into place.
2 To use:
• locate the position of
the ISOFIX low anchor-
age,
• slide the guide in until
it contacts the steel rod
• allow the guide to push
up until it is secure on the
steel rod.
1 Check the bubble
level indicator to see
if recline level is still
correct.
Adjust if necessary.
2. Pull back to check
both sides are latched
securely.
2
2
1
1918
INSTALLATION
INSTALLATION
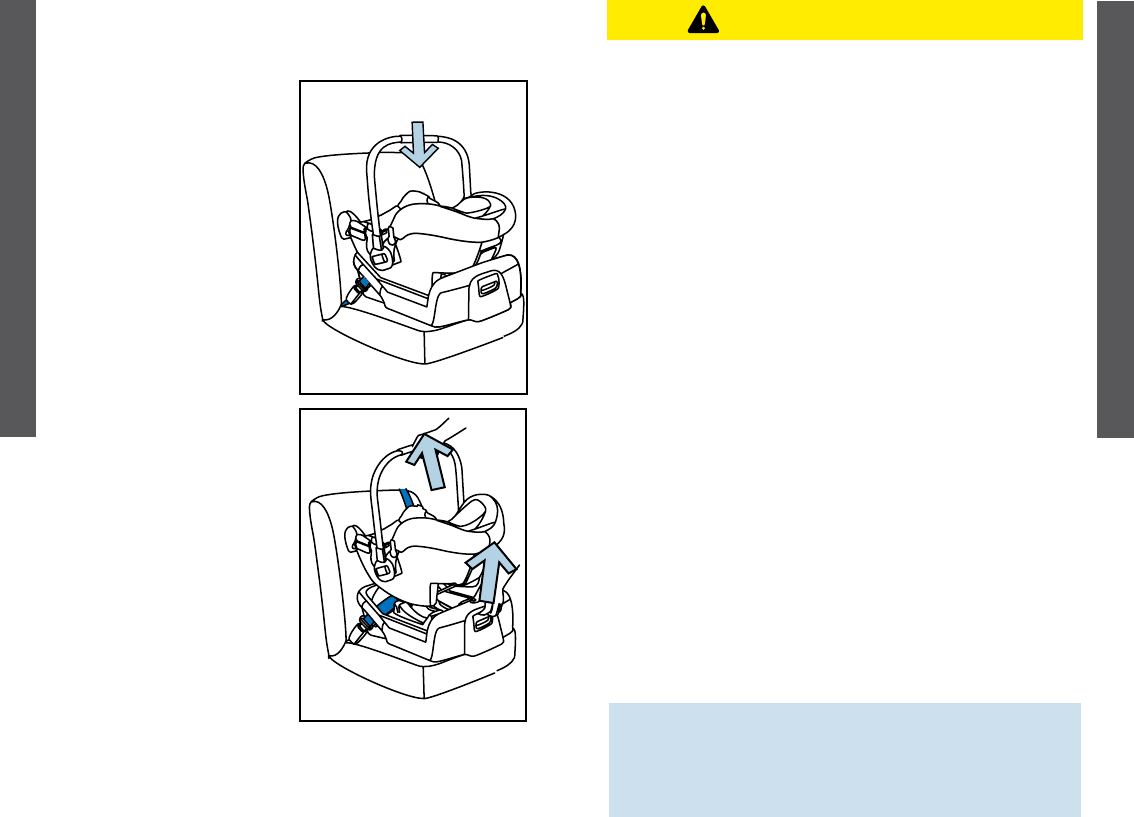
Fitting Restraint to Base
To Install
First make sure there is
nothing in or on the base
(blankets, toys etc).
These may stop the restraint
from latching securely.
Lower the restraint down
into the base. Listen for a
"CLICK" from the latches in
the base.
Pull up on the restraint to
ensure it is securely latched.
To Release
Lift the restraint with one
hand while pulling up on the
release latch at the back of
the base.
"CLICK"
WARNINGS – Top Tether
THIS RESTRAINT MUST BE ATTACHED TO A CHILD
RESTRAINT UPPER ANCHORAGE POINT IN THE CAR.
REFER TO CAR OWNERS HANDBOOK FOR LOCATION
OF ANCHORAGE POINTS.
REFER TO A CHILD RESTRAINT FITTING STATION IF NO
ANCHORAGE POINTS ARE IN THE MOTOR CAR.
THIS RESTRAINT IS NOT SUITABLE FOR USE WHERE
THE TOP TETHER STRAP MAY FALL INTO A SPLIT IN
THE SEAT BACK OR OFF THE SIDE OF THE SEAT.
Always secure the loose end of the top tether strap to
prevent it hanging out of the car or being accessible by
the child.
It should be stored in the bag provided on the end of the
strap.
Do not use the child restraint where this strap may fall into
a split in the seat back or off the side of the seat.
ALWAYS ATTACH HOOK AND REMOVE SLACK.
CAUTION: CHILDREN CAN BE INJURED OR RE-
STRAINTS AND TOP TETHER STRAP DAMAGED BY
UNSECURED CARGO IN A COLLISION.
SECURE OR REMOVE HAZARDOUS CARGO BEFORE
USING THIS CHILD RESTRAINT.
In some vehicles without a xed parcel shelf an
extension tether strap may be required. These are
available in several different lengths and can be
obtained from child restraint retail outlets.
2120
INSTALLATION
INSTALLATION
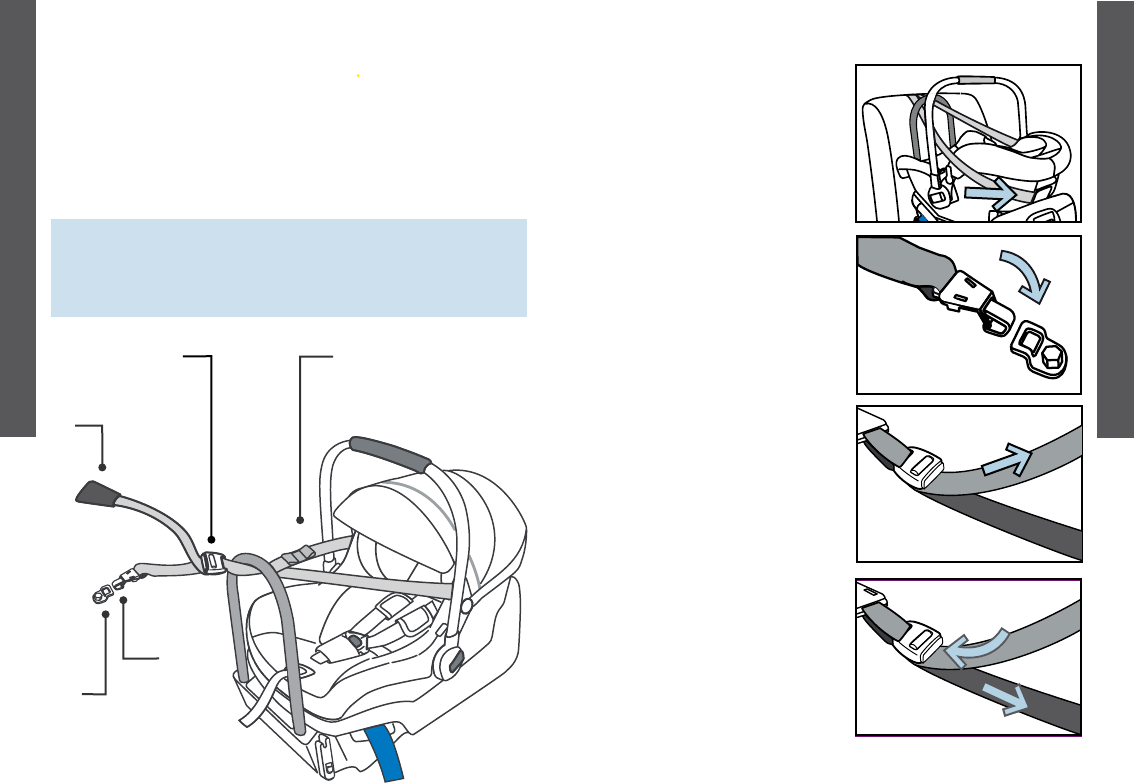
Tether Strap - Use
Always use the tether strap.
Connect the tether strap to the built-in anchorage tting
in the vehicle, or if there is not one available, install the
anchor tting supplied with this restraint.
Store the extra webbing in the bag attached to the end of
the tether.
NOTE: the tether strap wraps around the sides of the
restraint, not over the top.
If the canopy is tted the tether passes outside it.
Always connect the snap
hook securely to the an-
chorage tting.
To increase webbing
tension pull upper strap
through adjustor.
Tether Strap - Use
PULL
To release webbing tension
press adjustor button and
pull lower strap.
PULL
PRESS
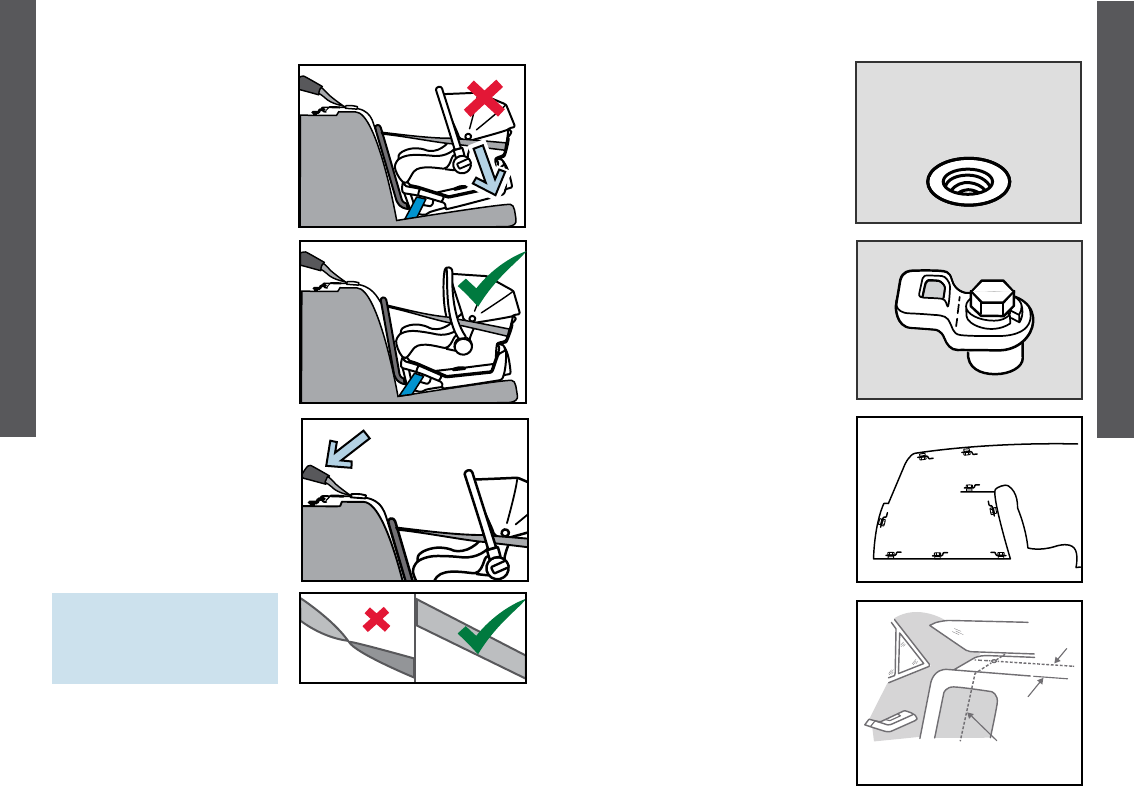
When the restraint is in a
vehicle always t the tether
into the guide at the back.
Tether Strap
Snap Hook
Tether
Anchorage
Tether Adjustor
Tether End
Storage Bag
2322
INSTALLATION
INSTALLATION
Do not adjust so tight that
it lifts the child restraint off
the vehicle seat.
Store unused web in bag on
end of tether.
Tether Strap - Use
Straps must
not be twisted
Most cars have several
threaded holes to t the
tether anchorage to.
Refer to the vehicle owners
handbook for information
on the location of these
points.
Using the bolt provided
attach the anchor tting to
the mounting point behind
where the child restraint is
to be installed.
See more detailed
information on the next
page.
The threaded hole for
the anchorage bolt
may have a plastic
cover over it
centre-line of seating position
100 mm
minimum
The anchor tting must be
aligned as shown unless
stated otherwise in the
vehicle owners handbook.
If drilling a new hole, select
a position on the centre line
of the seating position, and
no closer than 100 mm from
the front edge of the parcel
shelf.
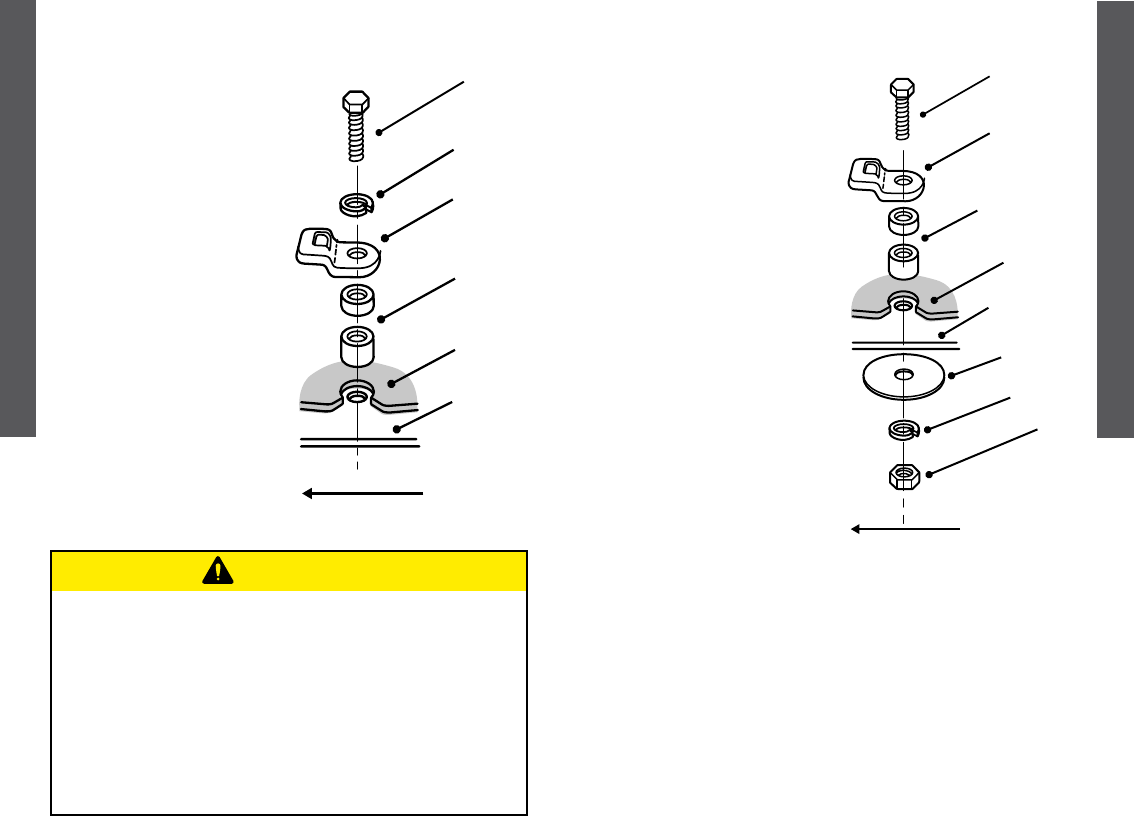
Tether Anchorage - Installation
2524
INSTALLATION
INSTALLATION
If the car is fitted with a
child restraint anchorage
point:
Locate the anchorage point
behind the rear seating
position (consult the vehicle
owners handbook for loca-
tion of the anchorage point).
Remove the thread plug from
the parcel shelf/oor/roof
and install the attachment
bolt as shown opposite.
CAUTION:
DO NOT OVERTIGHTEN
THE ATTACHMENT BOLT.
MAXIMUM TORQUE 20Nm.
Attachment
Bolt
Lock
Washer
Spacers (if
required)
Anchor
Fitting
Vehicle
Metal
Structure
Vehicle
Trim
FRONT OF VEHICLE
WARNING
CHILD RESTRAINTS MUST NOT BE ATTACHED TO UNSOUND
METAL OR WOOD OR SYNTHETIC STRUCTURES. WHEN
DRILLING THE 9 MM HOLE DO NOT DRILL THROUGH FUEL
LINES, FUEL TANKS, ELECTRICAL WIRING, OR RADIO
SPEAKERS. WEBBING STRAPS MUST BE PROTECTED FROM
SHARP CORNERS AND EDGES.
THE ANCHOR FITTING MUST BE USED ONLY AS DESCRIBED
ABOVE. IT MUST NOT BE HOOKED ONTO ANY OTHER
OBJECT.
Tether Anchorage - Installation
If the car is not fitted with
a child restraint anchorage
point:
For sedans only - drill a 9
mm hole in the parcel shelf
on the centre line of the
seating position as shown
on page 27.
Install the anchor bolt as
shown opposite.
It is recommended that this
installation be carried out by
a child restraint tting station
or licenced motor mechanic.
For vehicles other than
sedans - In Australia,
consult your nearest child
restraint tting station or
trafc authority for vehicle
inspection to nd the best,
correct position for the
placement of the anchorage
point, and for the correct
attachment bolt length and
use of spacers.
In New Zealand, consult the
agent for the vehicle.
Attachment
Bolt
Spacers
(if required)
Anchor
Fitting
Vehicle
Metal
Structure
Vehicle Trim
FRONT OF VEHICLE
Lock
Washer
Nut
Reinforcing
Washer
Tether Anchorage - Installation

2726
INSTALLATION
INSTALLATION
Use with Strollers
This Bugaboo
™
child restraint can attach to Bugaboo strollers
using adapters. Instructions are included with the adapters,
which are sold separately.
Cleaning and Maintenance
Seat Cover
Use mild soap or upholstery shampoo.
Wash separately.
Do not bleach.
Do not soak.
Do not tumble dry.
Dry at in the shade thououghly before reuse and avoid
direct heat and sunlight.
Do not dry clean.
Plastic and Metal Parts
Use only mild detergent, water and a soft cloth to clean the
car seat shell, handle and harness straps. Air dry.
Do not use undiluted detergent, or other solvents to clean -
these may cause damage.
Harness Buckle
To clean the buckle: rinse using warm water. DO NOT use
any soaps, solvents or lubricants. Using anything other than
water can cause the buckle to malfunction. Air dry.
When the buckle is operating correctly the tongues will push
in easily and will CLICK when they latch into place.
If the buckle does not appear to be working correctly get it
checked or replaced by contacting the retailer from where it
was purchased.
Harness Straps
Spot clean. If damaged contact the retailer from where the
restraint was purchased to have them replaced.
Storage
Remove the child restraint from the vehicle seat if not in use
for a long period of time. Put the child restraint in a cool, dry
place and somewhere your child cannot access it.

2928
INSTALLATION
INSTALLATION
The information contained herein is subject to change without notice. Bugaboo
International BV shall not be liable for technical errors or omissions contained
herein. The purchased product may differ from the product as described in this user
guide. Our most rnt user guides can be requested at our service departments or
at www.bugaboo.com. © 2019 Bugaboo International BV. BUGABOO, BUGABOO
FOX, BUGABOO CAMELEON, BUGABOO BEE, BUGABOO DONKEY, BUGABOO
BUFFALO, RUNNER, BUGABOO BOXER and the Bugaboo logos are registered
trademarks. The Bugaboo® strollers are patented and design protected.
©2019 Nuna International B.V. Nuna and all associated logos are trademarks.
